
How many times have you clicked on the tiny arrow on an Instagram post?
Maybe it is to check out what your favourite influencer is up to at a music festival. Or to read a new blog post from a leading publication. In these cases, you’re using Instagram’s Carousel feature.
From big brands to micro-influencers, everyone is using this feature to get their audiences engaged. It’s an innovative way to kindle the curiosity of your audience. In this post, we’re going to discuss what Carousel posts are and how you can leverage them to promote your brand.
- What are Carousel Posts on Instagram?
- How to Create Instagram Carousel Posts
- Open Instagram
- Create a new post
- Select photos and videos
- Edit or add filters to your photos
- Write a caption, tag your friends, and add your location
- Best Ways to Use Instagram Carousel Posts to Promote Your Business
- Final Thoughts
- Frequently Asked Questions
What are Carousel Posts on Instagram?
Having to choose just one picture to showcase an important event or a product may seem a little unfair. After all, you may want to display various moods of the overall experience. Similarly, for your products, you may want to share product variations including different colours, patterns, or sizes.
That’s where Carousel posts on Instagram can come in handy. They enable you to highlight the best features of your product in full glory.
With the Carousel feature, you can post multiple images and videos in a single post. Instagram allows you to post up to 10 photos and videos together. You can think of it like an expandable folder. In some ways, it’s also like a slideshow.
In Carousel posts, you can edit each of these photos or videos individually or with the use of a common filter for all the media files. But since it’s considered as a single post, you’ll have to use a single caption and location for all of them. When you publish a Carousel post, your audience will see a set of dots under the imagery.
As you can see in the screenshot below, Sephora has used a Carousel post to showcase their limited-edition fragrances. It allows their audience to take a better look at their products in an engaging manner.
How to Create Instagram Carousel Posts
Creating Carousel posts on Instagram is easy. Let’s take a look at the steps you need to follow:
Open Instagram
Log in to your Instagram account on iOS or Android app. (Note that the options given in both the apps may slightly differ.)
Create a new post
Tap on the “+” icon to add photos or videos to your new Instagram post. When you are redirected to your phone’s photo folders, click on the “Select Multiple” option.

Select photos and videos
Every photo that you select will be displayed on the top section of your screen. You will also see a number added to the thumbnail of the selected photos. You can share a maximum of 10 videos, 10 photos, or a mix of 10 photos and videos in one post.
Once you have selected the photos and videos for your Carousel post, click on “Next.”

Edit or add filters to your photos
You will be able to scroll through all the chosen photos and videos at this point. If you want to apply the same filter to all your posts, you can simply tap on a filter of your choice. For instance, in the screenshot below, if you click on “Clarendon,” the filter is applied to all the selected photos.
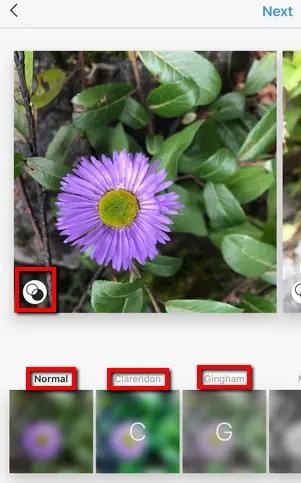
Alternatively, you can also edit each photo or video individually. For this, you need to click on the “Edit” icon displayed on each chosen photo or video.
Once you are done with editing, you can click on “Next.”
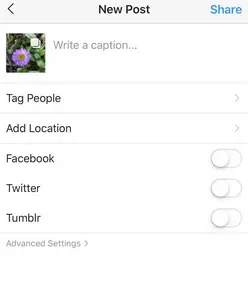
Write a caption, tag your friends, and add your location
The final thing to do before you publish your Carousel post is to write a caption. Keep in mind that the same caption is displayed for all the chosen photos and videos. So, pick a caption that’s relevant to all of them.
You can also tag your friends and add your location in the post. In addition to this, you can publish your post on multiple social media platforms by selecting the appropriate options given on the screen. To disable comments for your Instagram carousel post, you can go to “Advanced Settings.”
Once you are done with this, click on “Share.”
Best Ways to Use Instagram Carousel Posts to Promote Your Business
When it comes to Carousel posts, innovation is the name of the game. Take a look at these examples of Instagram Carousel posts to get some inspiration:
1. Do an Event Recap
With Carousel posts, you can share the atmosphere and the vibe of an event in just one post. You don’t have to resort to spam and keep sharing multiple posts of the same events. It’s a great way to give your followers the essence of an event without seeming too pushy.
In addition to this, you could also tag a few people who attended your event in your post. Thank them and let the world know how much fun they had there. With this strategy, you’re sure to create FOMO for your next event.
McDonalds showcased the best moments from their concert, Beat of My City in Chicago. In their post, they featured photos of Juice WRLD, Dj Oreo, and Serayah from the concert.
2. Share Behind-the-Scenes Stories
Give your audience a sneak peek behind-the-scenes to keep them engaged. This strategy can work really well if a lot of A-listers attend your events. Whether it’s celebrities bonding over a cup of coffee or singers playing some funny pranks on each other, it’s all good content for your Carousel posts.
As you can see in the screenshot below, Versace gave their followers a sneak peek into the behind-the-scenes action from their photo project with Cillian Murphy for #VersaceIcons. Their post received more than 98,577 likes.
3. Introduce Your Employees
Want to establish real connections with your followers? You need to add a human touch to your marketing campaigns. Let your customers see who your employees are and what they are passionate about.
Sharing stories of your employees can go a long way in building trust and credibility for your business. It can also be a great opportunity to highlight your work culture and values. It’s a double win.
Starbucks nailed this strategy while showing their support of the Pride movement.
4. Share User-Generated Content
User-generated content can be an asset for your business. It can drive brand loyalty, improve your brand reputation and build a sense of close-knit community on your Instagram channel.
With Carousel posts on Instagram, you can share multiple images and videos of UGC.
As a part of their #ShotoniPhone campaign, Apple showcased photos shot by their customers on their Instagram profile. By curating UGC, Apple encouraged their audience to take more photos on their iPhones. At the same time, stunning photos highlight the camera quality of their phones.
5. Share Your Brand Story
Instagram Carousel posts can also be used to share your brand story with your followers without seeming out-of-sync. The key is to make sure your Carousel post fits in well with the overall aesthetic of your feed.
It’s a great way to tap into the potential of storytelling and sharing your brand’s journey. From photos of your first product to snapshots of your first office, you can use it all in your Carousel posts.
Marriott International shared some interesting trivia about their company in one of their Carousel posts. They revealed that Marriott International began as a restaurant chain called “Hot Shoppes.”
6. Share Makeover Stories
Show, don’t tell — that’s the golden rule of marketing. No matter how many of your product’s features you list, consumers won’t be convinced to buy it until they see what it can do. You can use your Carousel posts to show your audience exactly what your product can do.
For skincare, hair, and beauty products, makeover stories can do wonders. Or maybe you could also do a “Before vs. After” Carousel post. Nothing is better for marketing than tangible results!
For instance, in a series of photos, Huda Beauty showed how their new eyeshadow palette could be used to create different looks. From light daytime makeup to glamorous party looks, they covered it all in their post.
7. Showcase Customer Reviews
Many brands showcase their customer reviews on their websites. That’s pretty mainstream. But have you considered doing the same on your Instagram Carousel posts?
Kylie Cosmetics routinely displays sweet words from their customers on their Carousel posts. Not only is it a great way to boost your brand reputation, but also to increase your credibility and trust.
Final Thoughts
Carousel posts on Instagram are extremely versatile. You can use them to share your brand story, do a quick event recap, launch new products, share makeovers, and more. If done right, Carousel posts can boost your engagement, brand loyalty, and even sales. So, what are you waiting for? It’s time to create your own Carousel posts.
Frequently Asked Questions
How Do I Create Seamless Instagram Carousel Posts?
Creating seamless Instagram carousel posts involves designing your images so that they transition smoothly from one slide to the next. Use design tools like Canva or SCRL to create a continuous image spread across multiple slides, ensuring each slide aligns perfectly with the next. Export the design in the correct dimensions (usually 1080 x 1350 px per slide) to maintain quality and avoid cropping issues when uploading to Instagram.
What Are the Best Practices for Optimizing Instagram Carousel Posts?
To optimize Instagram carousel posts, start with a compelling first image to grab attention. Use 6-8 slides to keep the audience engaged, and ensure each slide offers unique value. Include a strong call-to-action (CTA) in the final slide and make use of Instagram’s analytics to track performance, allowing you to refine your strategy based on engagement data.
Can You Add More Than 10 Photos in an Instagram Carousel Post?
No, Instagram currently limits carousel posts to a maximum of 10 photos or videos. If you need to showcase more content, consider creating multiple carousel posts or utilizing other Instagram features like Stories or Reels to continue the narrative.
How Do Instagram Carousels Compare to Single Image Posts in Terms of Engagement?
Instagram carousels often outperform single image posts in terms of engagement. Carousels provide a layered storytelling experience, leading to higher interaction rates. On average, carousel posts achieve a 1.92% engagement rate, as users spend more time swiping through multiple images, which increases dwell time and visibility in the Instagram algorithm.
How Can Brands Use Instagram Carousels to Boost Engagement and Follower Growth?
Brands can use Instagram carousels to showcase product variations, share behind-the-scenes content, or tell a compelling brand story. By creating valuable and visually appealing carousel posts, brands can increase engagement, encourage followers to explore more content, and even attract new followers through the shareability of carousel posts. Cross-promoting similar accounts within carousels can also drive mutual growth and collaboration opportunities.
SUGGESTED

How to Use Instagram Carousels in Your Marketing
Want to get creative on Instagram? Instagram carousels are a great option for engaging...

Instagram Shares Its Content Playbook: When to Post What
Leverage Instagram’s formats strategically: Reels for discovery Carousels for depth...

100 Mind Blowing Instagram Stats You Need to Wrap Your Head Around
Wondering if Instagram is worth investing in as a marketing and advertising platform...