Looking for a helpful Kajabi review? This one’s packed with all you need to know about the platform. We’ve included a breakdown of every feature. You’ll find videos, images and also comparisons with alternative course platforms you may have heard of. Reading this review will give you the most in-depth look at Kajabi special. Let’s get started!
What is Kajabi?
Kajabi in an online course platform. It offers a collection of built-in tools that help course creators build, market and sell their courses. Tools include the ability to offer memberships, create a course, build a website, email marketing, e-commerce, a CRM, and sales funnels.
Kajabi Review: Why Kajabi was Built
Building an online business is no simple feat. Beyond a winning idea, you need to pull together all sorts of technology to get it going. And that’s the problem Kajabi wants to help you solve.
If you’re like most entrepreneurs today, your idea is gold, but you may not have the technical skills to code or design your own site, mobile app, or landing page. You also may not have a large budget to spend on acquiring the talent you need to build your business, let alone have the time to research it all.
And that’s where this platform shines. Kajabi’s idea is simple. It’s an all-in-one platform designed to bring together all you need to launch your online business. And this is a major win for the little guy. If you’ve been putting off your idea because it costs too much money to invest in website development, connecting a payment gateway, paying for a CRM or email marketing software, that wait is over.
How to Use Kajabi
Kajabi is positioned as a tool for online businesses and can be used in two ways. If you’re a business owner that needs a single online platform to host your website and landing pages, have your website connected to a CRM, email marketing, and also have access to analytics, this is all you’ll need.
If you’re a course creator and want to produce a high-quality online course, Kajabi can help you make that happen, too. Its features are flexible enough and, in a way, ideal for online course creation, marketing, and sales.
Take Mel Abraham’s training site for example. Abraham is a business coach. He uses Kajabi to sell his online courses and also built his training website on the platform. On his site, you can view all courses and pay for one, all of which is managed by Kajabi.

Kajabi Features
As an all-in-one platform, Kajabi is packed with all you’ll need to launch your online dream. Here’s a rundown of what it’s like to use Kajabi.
First, Create a Kajabi Account
To get started, you’ll need to sign up for a Kajabi account. Committing to an online platform is often not the easiest thing to do. The idea of spending time building something to test how functional the platform is can be a little daunting. Kajabi offers a 14-day trial to make it easier to test-drive their platform. The sign-up process takes all of two steps, but there is a caveat. You’ll need to provide credit card details for your trial.
Sure, some may find it hard to part with card details for a free 14-day trial, but it’s worth it. As this Kajabi review will show, the platform isn’t only packed with tons of great features, it’s also easy to use.


Once you’re past the sign-up process, you’ll need to complete a short questionnaire to help Kajabi learn more about your brand, and guide you through creating a winning course. If you need to leave your computer in the middle of your onboarding survey and later log into your account, don’t fret. You’ll be able to pick up where you left off.
Kajabi’s been smart about how it introduces its platforms to new users. And that’s something we’ve seen more course platforms spend time on. After all, if people struggle to use your product, you’re less likely to hold onto more customers over time.
Setting up your Kajabi account requires adding a business address. If you don’t own a business, your personal address will do and can be updated should you incorporate. Admin out of the way, it’s time to sink your feet into Kajabi.
You’ll be greeted by a pop-up window with a welcome video. It’s all of 1.25 minutes long and worth the watch. In it, you’ll meet CEO and co-founder Kenny Reuter, and he’ll address some of your questions and concerns around using the platform. Reuter also does a great job at making you feel like you’re right where you need to be to build your business.

Kajabi Assistant
Onboarding is a mammoth task. To simplify the process, new users are introduced to Kajabi’s “Learn the basics” page immediately after the welcome message. And if you have wondered how to get started building your course, this page answers all questions.
It includes a four-step layout that shows you how to perform tasks. Sections include around seven to 12 minutes of content, making them quick and easy to digest. You’ll learn how to:
- Create a product
- Package your product
- Sell products, and
- Set up your website

Below the walk-throughs, you’ll find access to educational content. You’ll see free pre-recorded and live training on how to:
- Build and automate your marketing
- Create, package, and price your products, and
- Grow using webinars, email and blogging

You also get access to Kajabi University. It offers updates on all features and how to use them when released, along with two courses, “Hero’s First Steps” and “14 Days To Launch” to get you going (more on Kajabi University below).
Website Builder
While building your website is likely the last step you’ll take before launch, there’s a lot to be explored. Here’s a look at what’s available.
The website builder includes four sections. These are Design, Pages, Blog, and Analytics. Each section comes with unique customization features covered below.
Designing Your Site With Kajabi Website Templates
You’ll immediately find that the builder has been designed with beginners in mind, but has all you need to create a professional site. Start by picking a theme from a collection of 14 or upload your own. Clicking on a theme will produce a pop-up window with the theme’s preview, a short description, and a button to install it or keep browsing.

You may think this means drag-and-drop functionality, but it’s not. Instead, you’ll be able to arrange sections of your site by shifting them up or down in the left-hand menu and all updates made in the left-hand navigation section appear in the site preview window on your right.
Sections also come with customization options. You can change text colors, font types and size, change and add images and videos to the background, use image overlays, adjust the spacing of elements on a web page, align items, and delete what you don’t want.
You can also include pop-ups and two-step opt-ins when building your site, both of which offer customization options along with redirect URLs for thank you pages, progress bars, and more. Altogether, while the mechanics of the website builder may take a few minutes to warm up to, it’s really easy to use.
Tweaking Settings
Kajabi’s theme settings tab can be used to tweak each page. It allows you to add a favicon, set typography and a color scheme, customize message colors, offers password reset recovery and color customization (for members/customers), includes the option to integrate Disqus, and you can add a unique background.
Adding Site and Landing Pages
Themes come with a collection of pages and you have the option of adding your own. When created, these are referred to as standalone or landing pages. Default pages include home, library, store, login, thank you, 404, and one for your blog. Creating the first page starts with the click of a button.
You'll then be taken to the collection of 14 templates to choose from. And Kajabi has thought of everything. You can design a streamlined sales page, streamlined long-form sales page, opt-in pages (including video opt-ins) and even a coming soon page. There’s also a policies page, and the collection of beautifully designed image-based pages to easily add to your site.
Once you’ve selected a page design to work with, click on it and then click the Get Started button. For your page to be created, you need to enter a page title and then click on the Create button.

Creating Your Blog
Setting up your blog is similar to creating a new page. Start by clicking on the Set up my blog button. Next, add a page title, description, and image. Click the Save button and you'll be able to then create a new blog post.
If you've ever created a blog post in WordPress or any other web-based platform you'll find this process rather intuitive. Kajabi offers all the important features to publish a blog post that's optimized for search engines, but also looks visually appealing. You can upload a video with a maximum size of 4 GB, images (including a blog feature image), and even add tags to help group similar blog posts. With the new blog post created, you can control its visibility by publishing it immediately, leaving it unpublished, or set a specific publish date.
A video of the blog creation process:
Diving Into Analytics
There's no getting around the importance of analytics. Launching an online business makes analytics important to know how well you're tracking towards your goals. In the Analytics section of your account, you'll have access to a collection of helpful metrics. These include a snapshot of the number of purchases completed within the last 30 days, net revenue generated the last 30 days, and revenue generated since the creation of your course.
You also get access to net revenue, subscription metrics, opt-ins, page views, product progress (showing customer progress through your course), offers sold, and the number of affiliate sales you completed.

Custom domains
What to use your own domain to host your online course? While managing a domain may seem like a confusing aspect of hosting a site, it is possible to roll-out your course using a unique, brand domain name. To help, Kajabi has an extensive knowledge base article filled with GIFs and videos to walk you through the process.

Products
Courses are all about distilling knowledge and turning information into a sellable product. And often, that’s a tough thing to do. It takes meticulous planning. You’ve got to know what content to use to attract people to sign up (think freebies like lead magnets and landing pages) and ultimately how you’ll share that knowledge when people have signed up.
Kajabi settles the uncertainty with a systematic approach. Its products feature is designed to help you easily structure your course content, making the process of creating and launching your offering simpler.
This approach includes the collection of easy-to-use templates. There is a Mini-Course, Online Course, Evergreen Training, Membership, Community, Coaching Program, and the opportunity to build your own product (course) from scratch using a blank blueprint.

Using templates is simple. You're able to edit everything on them, from the title of your course and its description to product thumbnails. You are able to select a theme for your course or stick with the default. While working with template themes, you are still able to customize the header, search bar, header image, welcome body, syllabus, sidebar and footers.

While exploring Kajabi, we came across the More Actions tab and found it a breeze to use. It allows you to add announcements, manage comments, progress, and clone or delete sections. Together, these features make communicating with your learners simpler. You're able to turn your course into a quality educational experience for learners through timely and easily-accessible engagement.

Offers
Offers are one of the more confusing aspects of Kajabi's platform. Admittedly, Kajabi is aware of this and created a short video that explains the difference between products, offers, and sales pages.
In short, your product is the actual thing you'll be selling. An offer is the price tag you associate with your product. Where things get a little confusing has to do with the number of products you can tie into an offer. Sure, it may not sound complex, but the tricky part (we think) has to do with how offers are positioned on the platform. There isn’t enough clear verbiage that explains all of this.
Here's the offers/product/sales video to connect the dots:
On a different note, offers also let you set terms of payment. Your product can be purchased at or paid in one go or via subscription. And we think this is a great touch by Kajabi. It opens the doors for course creators to maximize earning potential and also gives learners the opportunity to access larger complex courses for an affordable monthly premium. It also makes it possible for course instructors to create membership facilities, increasing revenue and making it more linear.
Setting up an Offer
While the verbiage around offers is a little tricky, setting up an offer is straightforward. Like all Kajabi design features, you can add text and customize almost every aspect of an offer. Users also have a preview option. There are also other features you should know about. The first is the cart abandonment email reminder. It’s a smart and effective way of driving revenue. When activated, Kajabi automatically sends an email to anyone who has reached the checkout page but hasn't completed their purchase.

The second feature we’re crazy about is Automations. Kajabi has been really smart about helping entrepreneurs spend less time working in their businesses allowing for the chance to be more strategic about the direction it is headed. You can create automations using triggers for just about anything. From email sequences to creating upsells for complementary products after a form is submitted.

Offer Checkout
Something not included in many Kajabi reviews is the Offer Checkout feature set. Kajabi provides a collection of features to customize details, change colors, add fields for extra contact information, edit your service agreement, add testimonials, add testimonials, and even offer upsells.

Sales Pages
To recap, sales pages are linked to offers which are linked to products. You create your product first, then an offer, and lastly a sales page. As you’d imagine, sales pages are a big deal. To be effective, you’ll need to create strong copy and include attractive design elements to persuade your audience to invest in your product. To help, Kajabi offers all of its design features to create the most effective sales page possible (more on this under the Marketing section below).
Getting Paid With Kajabi
One of the most rewarding experiences is finally selling a course. The great thing about Kajabi is that you keep 100% of the revenue generated sales. Unlike other platforms that take a percentage of each sale, Kajabi charges a monthly premium to use their platform. This means you get to sell as many courses as possible and offset the cost of using the platforms.
Kajabi comes with Stripe and PayPal integrations, making it easy to quickly link your accounts and be done with the technical payment stuff.
Refunds
Refund policies can be tricky. Because courses are information, providing access to them means that you give up the value of your product. But refunds are a must. Locking customers into products they do not want or don't find value in doesn't scream positive customer experiences, you'll have to find the best solution for your online course. Kajabi is flexible about refunds. It doesn't offer any refund policy requirements, leaving it up to each course creator to determine.
Marketing
The marketing hub inside Kajabi is where you'll find everything to do with how to promote your course. Modules include Pipelines, Email Campaigns, Automations, Events, and Forms. And with all of these put together, it's easy to see how you can create a well-oiled and automated marketing machine to help you sell more courses in less time and with less effort. Here's a look at how each module works.
Building Pipelines and Blueprints
Pipelines are automated marketing and sales funnels. In short, they help you create compelling messaging and guide buyers through the process of learning about and signing up for your course. Something we find really fascinating and couldn't ignore for this Kajabi review is the attention placed on creating effective pipelines. Kajabi has done what few course platforms have. They recruited Brendan Buchard, a well-known and highly successful performance coach, to design pipeline blueprints that you can quickly and easily make your own in just a click.
This means far less work trying to figure out what goes where and how to work the platform. Instead, you'll be guided through a sequence of steps that include typing copy according to very specific instructions to help you create the most compelling pipeline possible.
Powerful and Easy-to-use Pipeline Templates
Something we also think users will love is Kajabi's commitment to making their platform as accessible and easy to use as possible. Every module they offer comes with detailed step-by-step instructions and how to use the module, along with videos just in case text won't do it for you.
Getting started with pipelines is as simple as clicking on one of the six pipeline blueprints available, and then selecting a pipeline that agrees with your course. From then on, it's a matter of following instructions to create your messaging.
You can also pick from eight newer versions that include Freebie, Sales Page OVO, Product Launch OVO, Zoom Webinar OVO, Free Book OVO, Coaching Campaign OVO, Simple Sales Page, and a blank template.

Kajabi includes a collection of legacy pipelines should you want more variety. These include Free Report, Promotional Offer, Sales Page, Webinar, Product Launch, Virtual Summit, and Live Event. From then on, it's a matter of following instructions to create your messaging.

Email Marketing Campaigns
Email is a powerful marketing tool, and as such, it forms one of the critical components of building your marketing machine. Kajabi gives users the opportunity to create new broadcasts or email sequences, both of which come with a healthy amount of templates that you can edit.

For example, creating your first email broadcast includes three steps. Start with adding your recipients, editing content, and then sending it off. To edit your email you'll need to launch the email editor. It uses Kajabi'a familiar page design layout and includes sections and settings tabs where you can tweak every element of the template.

Automations
While we covered automations early on under the product section, they really are worth mentioning again. Automations actually fall under Kajabi's marketing feature set, making it easier to manage and automate the various parts of your promotion and sales strategy.
Creating Events
Events are an interesting touch and not something we see mentioned in any other Kajabi reviews, which is unfortunate. Events offer course creators the opportunity to build anticipation around the products and services. For example, events can be used to promote webinars. You can also include email opt-ins and sequences to nurture leads and ultimately generate sales.
Video from Kajabi on cerating an event:
Working With Forms
While forms may seem like one of the more simple elements of Kajabi, they're an important part of every effective marketing campaign. Kajabi's forms are easy to create and use. You can customize them by adding double opt-ins, editing form fields, adding automations, or leverage Kajabi's "After Submission Settings" that allow you to send notifications to your team, push data to a third-party email provider, or redirect your new contact to a customer thank you page.
Video from Kajabi on cerating an event:
People Management With Kajabi CRM
Like all smart platforms, Kajabi has made it easier for you to manage customers. Here’s a look at what it includes.
CRM Functionality
Through the use of an easy to use and fully functional CRM, you're able to segment your audience and create additional segments based on audience behavior (i.e. people who filled out a specific form). By default, your CRM will offer five segments. These are a complete view of every contact in the database, a list of members, a list of all subscribers, inactive subscribers, and a list of contacts with email addresses that have bounced.

Kajabi Assessments
Kajabi’s Assessments feature is one of our favorites. Producing a course that offers a true learning experience cannot be done without testing knowledge. You're able to create assessments and include multiple-choice, paragraph, file upload, multiple selections, and single selection options. The question creation feature is just as easy to use and get used to as the rest of Kajabi's design and creation tools.
It also allows you to set a passing grade and choose between a result breakdown preference of showing, hiding, or only showing a result breakdown if a learner passes the assessment.

Assessments are backed by certificates, however, they are only available through an integration with Zapier and Accredible.
Recruiting Affiliates
Affiliate programs are often hard to manage. Tracking sales and paying out your affiliates can create more headaches than it's worth. Kajabi removes the guesswork, pain, and complexity of the entire process. Every course creator is able to recruit affiliates directly through their dashboard. Simply head over to the Affiliate section and you'll be presented with affiliate sign-up and login links that you can offer affiliate partners.
And it doesn't stop there. The dashboard also includes an affiliate onboarding feature. It allows you to create a unique page for sign-ups, including adding your logo. You’re able to import affiliates, track the number of sales via the transactions tab, create and share new announcements with affiliates, and expoet a list of affiliates.

Going Mobile With Kajabi’s Mobile App
One of the commonalities of owning an online presence today includes having an app. While it sounds like a lot of effort, it’s worth it. Apps allow you direct access to your audience, helping you learn more about their interests, and make your product available on the go.
Kajabi knows that creating an app is an expensive endeavor. To help, they provide course creators with a ready-made mobile solution. Learners can download the Android or iOS app which is smooth and intuitive. Through it, they can access all Kajabi-purchased courses.

Kajabi also offers learners an easy way to access their courses if they’ve forgotten their login credentials. Using the app’s “magic link” lets them access courses without a password.
Kajabi Integrations
As integrations go, they’re necessary today. Entrepreneurs rely on the myriad of applications to do everything from email marketing to generating invoices. And Kajabi's spared no expense. They offer over 500 apps and leverage Zapier integrations.

Kajabi’s Cost
Finding the sweet spot for products like Kajabi is no simple feat. The platform includes everything you could possibly need to build a powerful online business. Kajabi has tried to accommodate as many entrepreneurs as possible by offering three payment plans. All come with annual discount options, too. You get the Basic, Growth, and Pro plans, each offering more scalability than the last.

Kajabi’s Customer Service
On the customer support front, you get 24/7 attention, making it possible for you to solve any problem on your own schedule. And if you'd rather not chat with anyone, you can access the online help center. All content is neatly categorized with clear and easy-to-understand instructions to help you get stuff done.

A Vibrant Community
Kajabi’s also gone a step further by including its course creators to produce a thriving community. You can get answers, provide support, and connect with a community of fellow entrepreneurs, experts, and influencers.
Kajabi University
You also get access to Kajabi University. It's filled with tons of videos and content to help you learn the ins and outs of the platform and produce your best work. Most of the content is packaged into bootcamps. You'll find everything from how to build a course, website, and community, to building an email list and pipeline.

There’s also a well-designed how-to series to help you do anything from move an existing course from another platform to Kajabi, create a blog, or even find your niche.

Kajabi Pros and Cons
Pros
- Clean design
- Great usability
- Sales funnel capabilities
- Marketing tools
- Reporting or analytics
- 500+ 3rd-party app integrations
- 24/7 support is available via email, and live chat
- Comprehensive knowledge base
- Student engagement tools available
- Drip content is available
- Can bundle and cross-sell courses
- Blog feature is available
- Affiliate program available
- Offers a 14-day no-credit card trial period
- Mobile apps available for students only
Cons
- No corporate sales option
- No course accreditation
- Mobile apps don’t offer instructor features
- Confusion about offers, products and sales pages
Key Takeaways for Instructors
Kajabi is a powerful platform. While slightly pricier than alternatives out there, spending 10 minutes on your dashboard is enough to understand why thousands of instructors choose the platform. It comes with everything you need to plan and produce a high-quality online course. Its collection of marketing tools make it a sophisticated but easy to use platform, especially when it comes to automating your business.
We love the fact that it's packed with tons of support. There is documentation and a video for almost any task you need to complete, making the platform easier to use and all the more so intuitive. While we are more fans of drag-and-drop functionality when it comes to building web elements, we still think that Kajabi's design panel and preview window feature is ideal for anyone who isn’t a web developer by trade.
Kajabi’s dashboard also makes the process of managing your course and business easier. You have access to all aspects of your enterprise, from CRM contacts to marketing tools, and the ability to quickly produce new products and pipelines.
Kajabi Rating
4.86. Kajabi really is an all-in-one course platform. It’s filled with features that streamline the complex process of building and selling an online course. Tools like the mobile app are a big win for creators and students as people love consuming content on the go.
While a little more expensive, it’s worth the monthly fee. Kajabi bundles all you need into a beautifully designed platform that doesn’t require any technical skills to operate. While an intuitive platform, there are certain areas that may be a little confusing for new creators. Take the difference between offers and products, and how they come together with sales pages. Learning curves aside, if you're looking for a new platform to host your course, give Kajabi a try. You will have 14 days to run through each of the features covered in this Kajabi review, which is ample time to fall in love with the platform.
Frequently Asked Questions
What does “Kajabi” mean?
“Kajabi” is an ancient Aboriginal word that means "Kite Hawk" or "Airplane".
What Kajabi website and membership site examples are available?
Here are examples to view:
- Voice Body Connection
- Empowerment Activators
Kajabi vs WordPress: which is better?
WordPress is a favorite of entrepreneurs. It offers a quick and easy way to get your brand online, and there tons of templates one can purchase. Unlike Kajabi, WordPress can be more complex to work with. Features like membership portals, and email marketing and payment integrations require more work set up.
Working WordPress also means that you may not have direct support for any setup challenges you may have. This often means hiring a developer to solve the problem, something that can be difficult. You'll have to find someone you can trust to get the job done and have a budget to accommodate development costs.
While WordPress is more affordable as a standalone platform, you also need to pay for additional features like a membership portal. This means purchasing plug-ins or paying for them on the monthly plan.
Altogether, Kajabi makes the process of building an online business simpler. There is no need to struggle with any of the creative aspects of building a site or integrating tools to realize your dream. You also spend a simple monthly fee for access to all the tools you need in one place.
Kajabi vs Podia: which is better?
Kajabi and Podia offer a collection of similar features. Both offer marketing and sales functionality in the form of funnels, integrations, affiliate recruitment, the option to bundle products, and more. Kajabi is, however, seen as a more expensive option. Podia offers two plans, the Mover for around $40/mo and the Shaker for around $80/mo, where Kajabi offers three plans that have prices ranging from around $120/mo to $399/mo. Read our complete Podia review for more.
Kajabi vs Thinkific: which is better?
Both platforms include a range of similar features. These include integrations, customizations, and marketing tools. Thinkific, however, differs in its approach to building content. Where Kajabi allows you to edit pages and forms using a preview section and editable panel, Thinkific offers drag-and-drop functionality.
Thinkific is also often marketed at a lower price point for their Pro plan, typically around $79/mo, where Kajabi’s is priced at around $159/mo.
Note: pricing fluctuates from time-to-time. Choosing between the two comes down to preference.
Read our complete Thinkific review for more.
Kajabi vs Teachable: which is better?
Teachable, Like Kajabi, Allows you to create courses through the platform. While Kajabi only offers your platform and marketing tools, Teachable also advertises courses the same way Udemy does with a course marketplace.
Both platforms include a range of similar features. For example, customization is a major aspect of building your course and an online platform. Both platforms allow you to customize everything from the look and feel of your course pages to email templates, and more.
That said, picking the "better" platform between the two becomes a matter of preference, and is related to the look and feel that you're most comfortable with. Read our complete Teachable review for more.
Kajabi vs Kartra: which is better?
Both platforms offer similar functionality. In fact, you'd be hard-pressed to identify exactly what sets them apart. Ultimately, it comes down to your preference for design and functionality.
One of the key differences between Kajabi and Clickfunnels is the way its platform is positioned. Kajabi is more targeted towards online course creators and includes powerful marketing tools like the pipeline blueprint. Clickfunnels is positioned as a sales funnel software solution designed to help you automate sales and scale your business online.
Kajabi vs Clickfunnels: which is better?
Clickfunnels is often compared to Kajabi because of its feature set and functionality. Clickfunnels offers a sales funnel and a membership area along with other features like a payment gateway, the ability to include video, email sequences, a collection of integrations, an affiliates program, and more.
Who are Kajabi’s competitors?
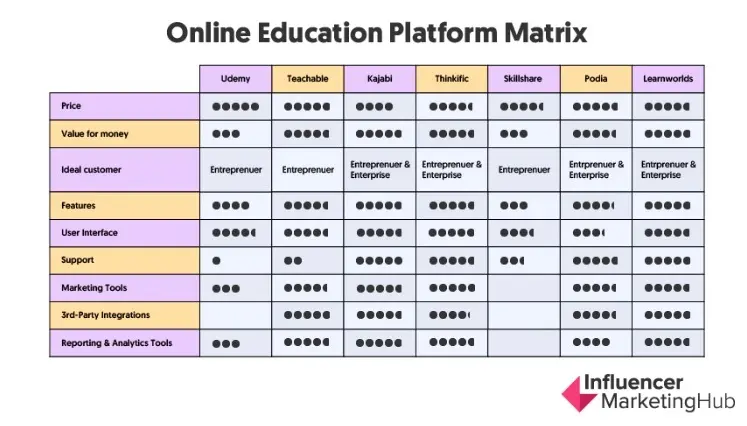
Kajabi has a host of competitors, each that offer similar solutions to online entrepreneurs. Some include Podia, Udemy, Thinkific, Teachable, Skillshare, LearnWorlds, and Clickfunnels.
What is the Kajabi 28-Day Challenge?
The 28-Day Challenge is a program designed to take new Kajabi uses through the process of creating an online course. It comes with everything you need in a step-by-step process and it's backed by support. Learn more about the 28-Day Challenge.
Kajabi Review
-
Features
-
Ease of Use
-
Support


