Promoting an event can be an exciting yet challenging process. You want to make sure you’re attracting as many attendees as possible, which means getting the event in front of the right audience through the most effective channels. Fortunately, social media platforms like Facebook now offer solutions for event promotions so you can effectively drive attendees to your event.
In this guide, we give you an in-depth look at the process of creating an Event on Facebook and how this can benefit you. We also give you additional tips on editing and sharing your Facebook Event. So let’s get started and find out how to create an Event on Facebook.
What is Facebook Events?
Events is a Facebook tool that allows you to organize events and create dedicated landing pages for them within the Facebook platform. You can use this tool to promote both in-person and virtual events by providing detailed information and inviting people to attend. The landing page is where people will find details about the event such as what it’s about, when and where it’s happening, how to join, who’s speaking, etc.
The event page can even be customized with eye-catching imagery to add visual appeal. So if used strategically, Facebook Events can be an effective way to promote your event and get more people to join.
4 Benefits of Creating an Event on Facebook
Before we dive deeper into the practical aspects, you may be curious to learn why you should consider creating an Event on Facebook. Without further ado, let’s look at some of the key benefits of using Facebook Events.
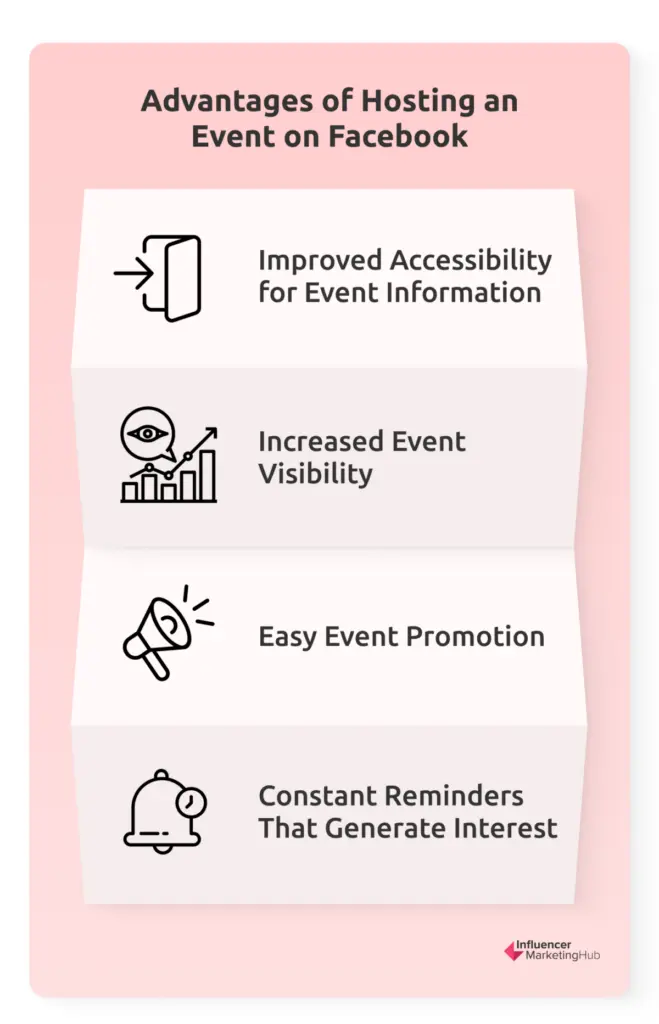
Improve Accessibility for Event Information
First of all, you’re organizing all the important information about your event in one place. This means that the information is easily accessible to anyone who wants to learn more about it. Whether they need to double-check the timing or find out how to attend the event, all the information is accessible in one place. This helps to improve the user experience, making them more likely to join the event and tune in for future events.
Get Increased Event Visibility
With Facebook being the largest social media network, creating Events on the platform allows you to significantly boost your event visibility. The latest Facebook stats report 2.9 billion people actively using the platform every month. In other words, you could potentially get your event in front of billions of people, hypothetically. While that may not be a realistic goal, it still means you could market your event in front of a massive audience.
With people sharing the event on their Timelines, it increases the chances of your event being seen by even more people. Even if the organic methods fail you, you can even leverage paid Facebook advertising solutions to boost your event visibility. This increased event visibility is exactly what you need to drive event attendance.
Easily Promote Your Event
Facebook makes it easy for event organizers to easily share their Event with others to get it in front of a bigger audience. Moreover, they can send out invites to specific users to ensure that the Event is seen and attended by the right people. As such, you can easily promote the Event to get it in front of your target audience and drive attendance.
Generate Interest with Constant Reminders
One of the most attractive perks of Facebook Events is the constant reminders the platform automatically sends out to people’s Feeds. Whenever someone engages with the Event, it will automatically reappear in the News Feeds of your friends and/or followers. That way, you can effectively generate interest and get people to pay attention to your Event. Even for those who’ve already opted to attend, these constant reminders will help them remember to attend.
How to Get Started with Events on Facebook
Facebook gives you the option to create an Event either from your personal profile or from your Business Facebook Page. Plus, you can also create public and private Events depending on what type of audience you’re targeting. So let’s break down the steps to create an Event on Facebook for all these different options.
Creating an Event from a Personal Facebook Profile
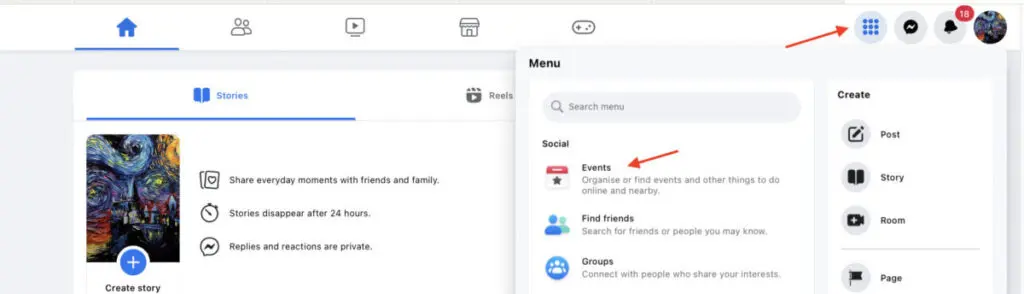
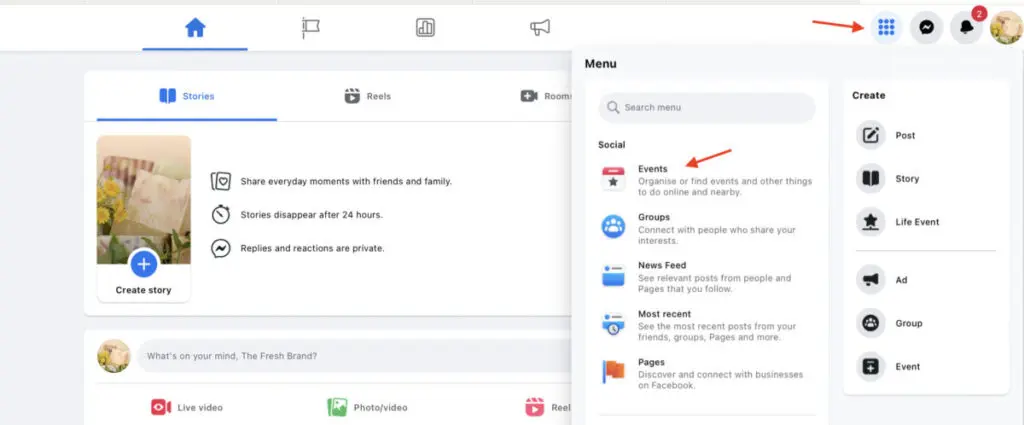
1. Log into your personal Facebook profile and click on the menu button at the top right-hand corner of the screen. Then select “Events” from the drop-down menu.
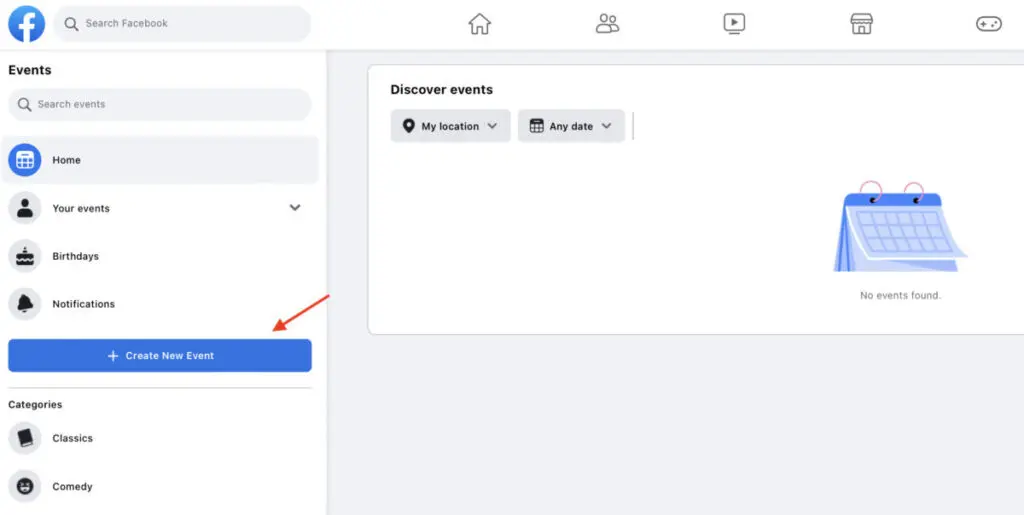
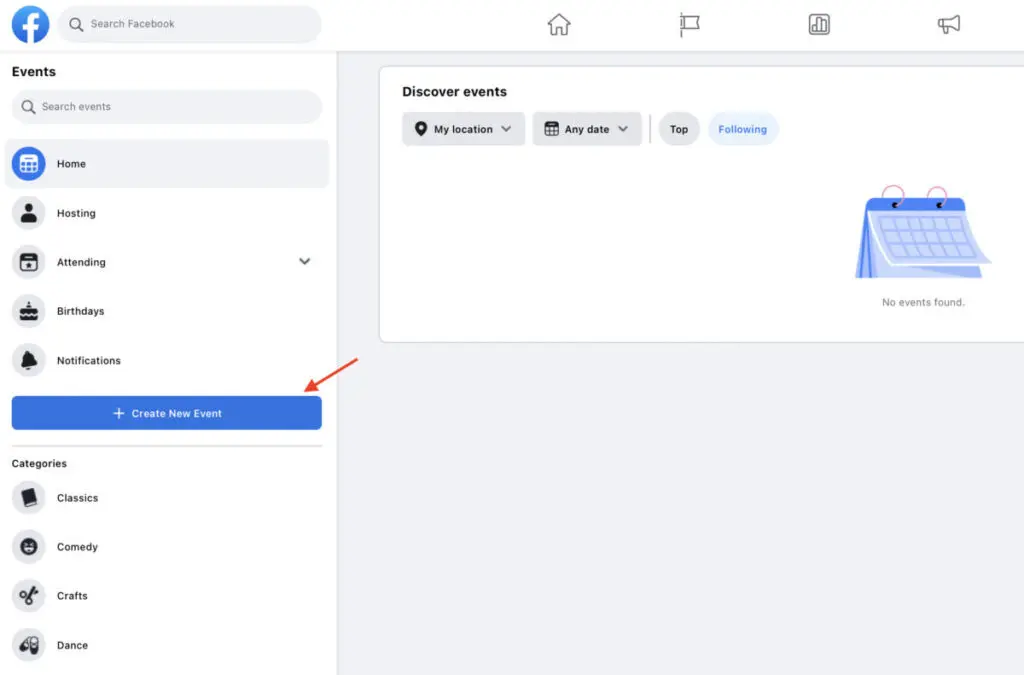
2. This will take you to a page where you can discover events taking place either online or in your location. You can even filter the results by category such as Comedy, Dance, Games, and so on. Click on the “Create New Event” button from the left-hand panel.
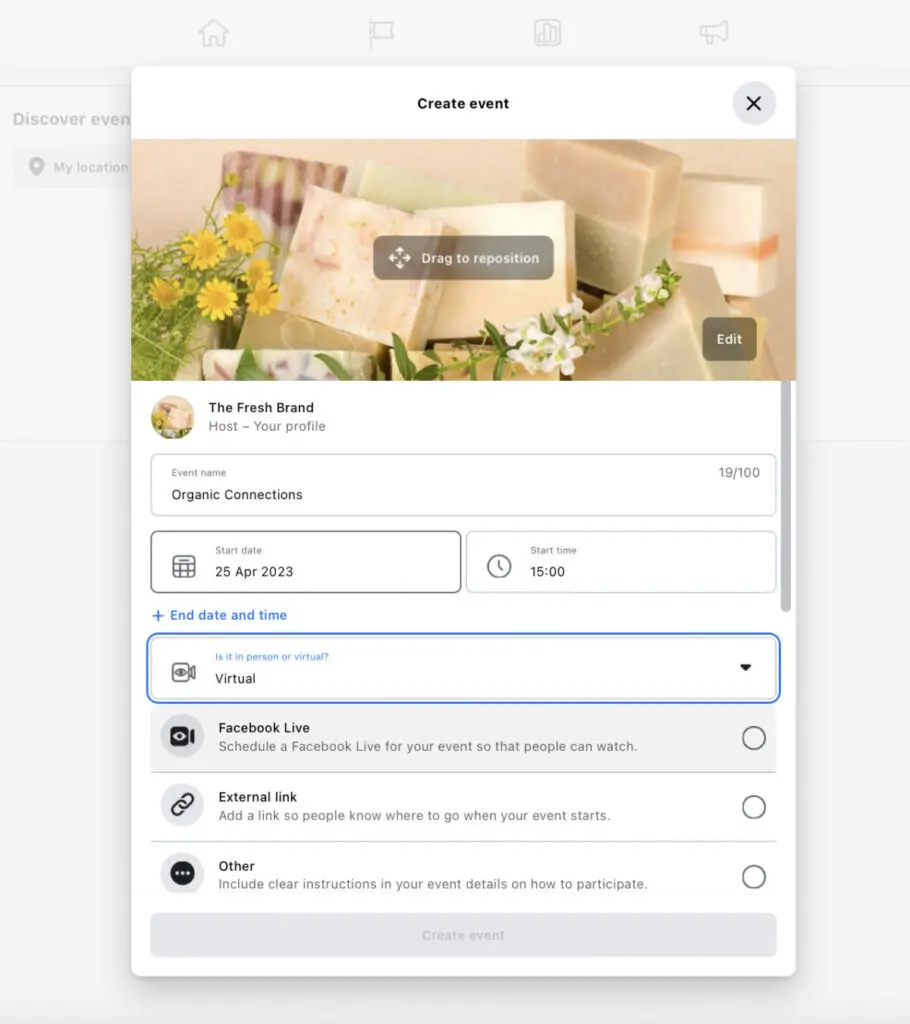
3. The next step is where you can provide details about the Event. Start by naming the Event and choosing a date and time. Make sure you upload an eye-catching event cover photo that’s relevant to the topic or theme, typically an original graphic created specifically for the event.
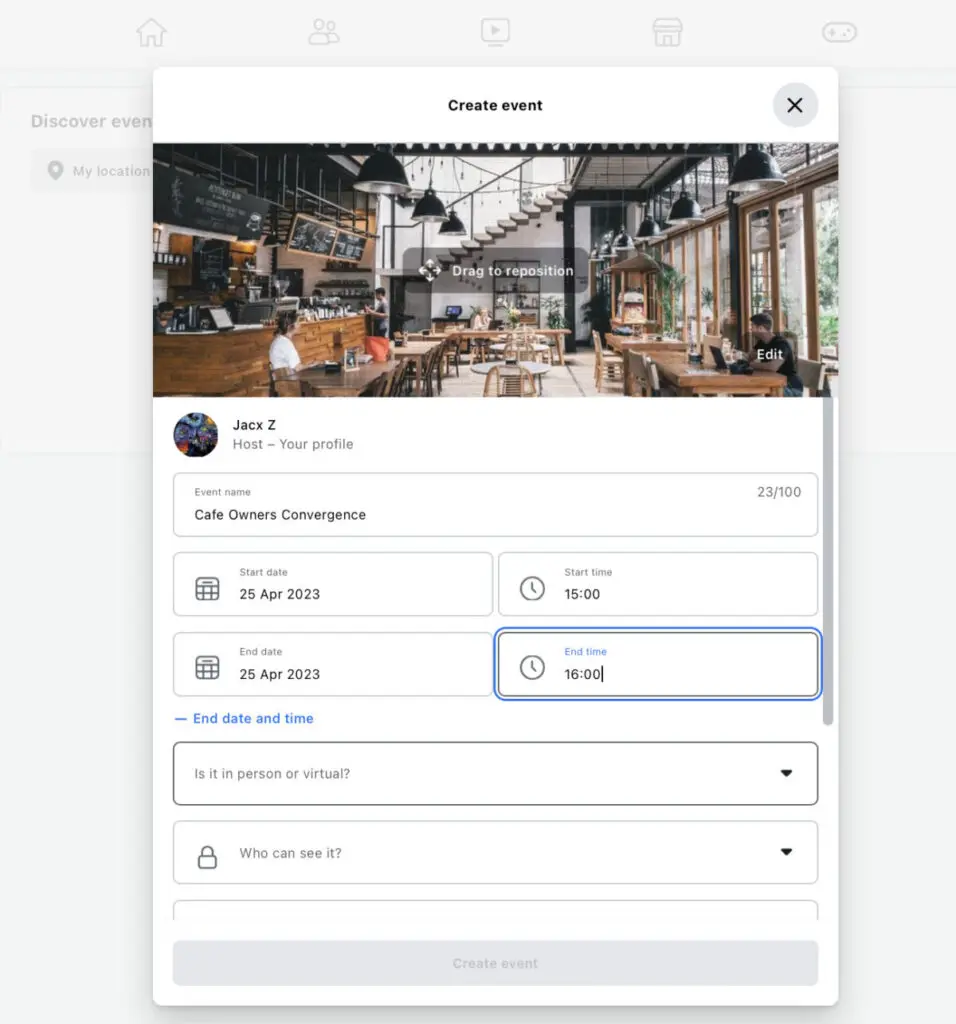
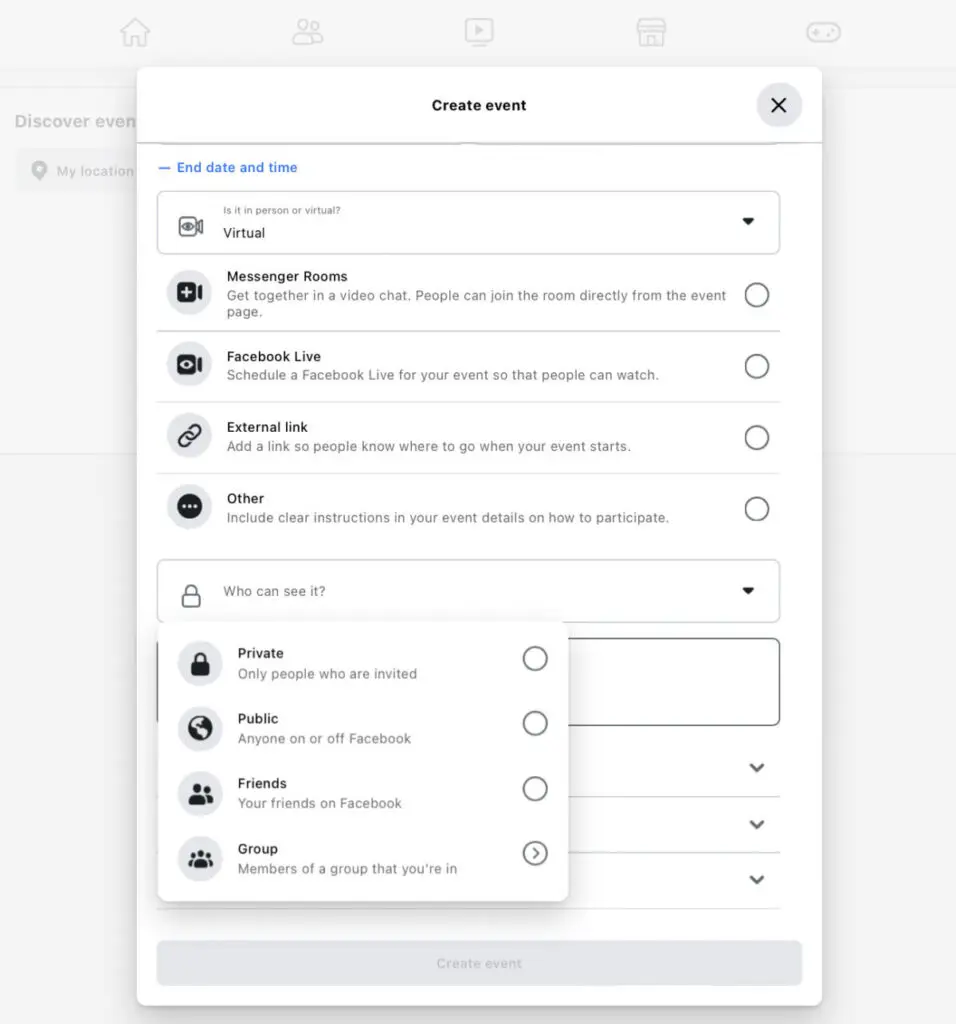
4. It’s also important that you select whether the event is taking place in person or virtually. If it’s an in-person event, you’ll need to include a location. If it’s a virtual event, specify the medium–whether it’s taking place through Messenger Rooms, Facebook Live, or external platforms.
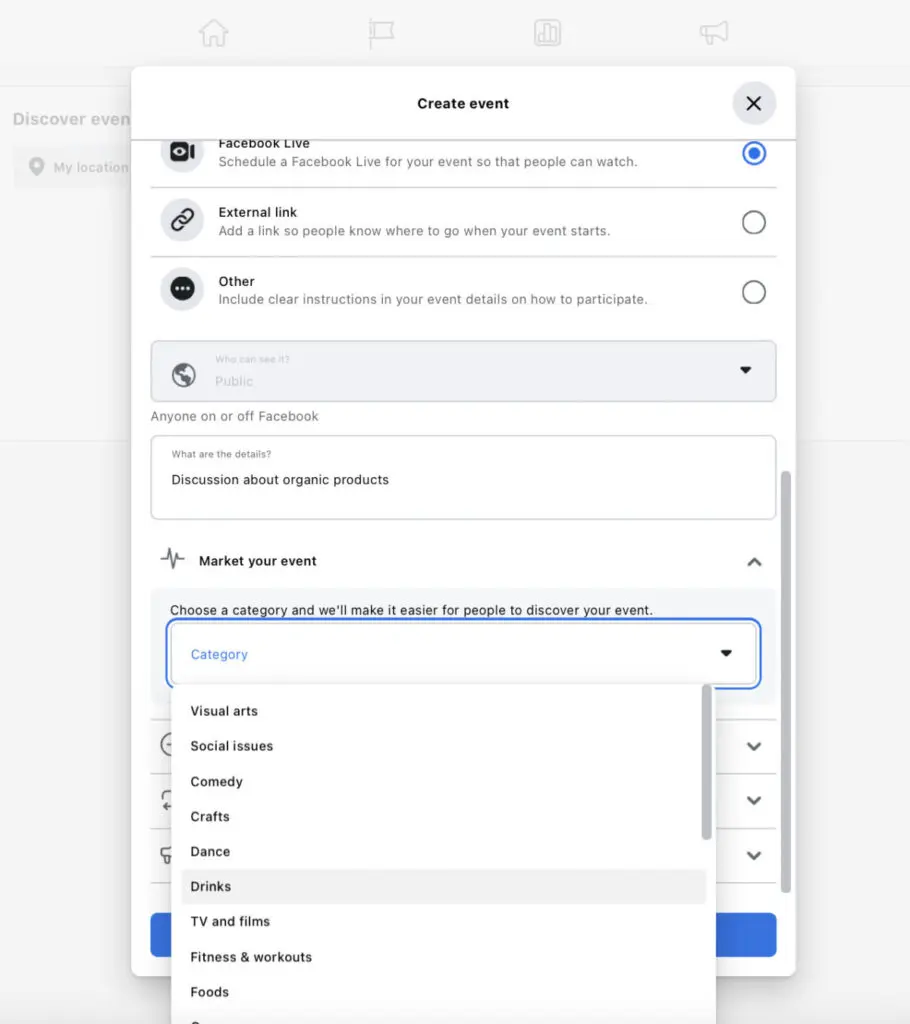
5. Next, choose the privacy level of the Event. Do you want everyone to be able to see the Event even if they’re not on Facebook? Then you’ll need to make the event Public.
Or perhaps you want to keep it exclusive by only admitting invited attendees. In this case, make sure you select “Private.” If you choose to make it a Private Event, you can also decide whether guests will be allowed to invite their friends. Additionally, you have the option to make it visible only to your Facebook friends or to members of the Groups you’re in.
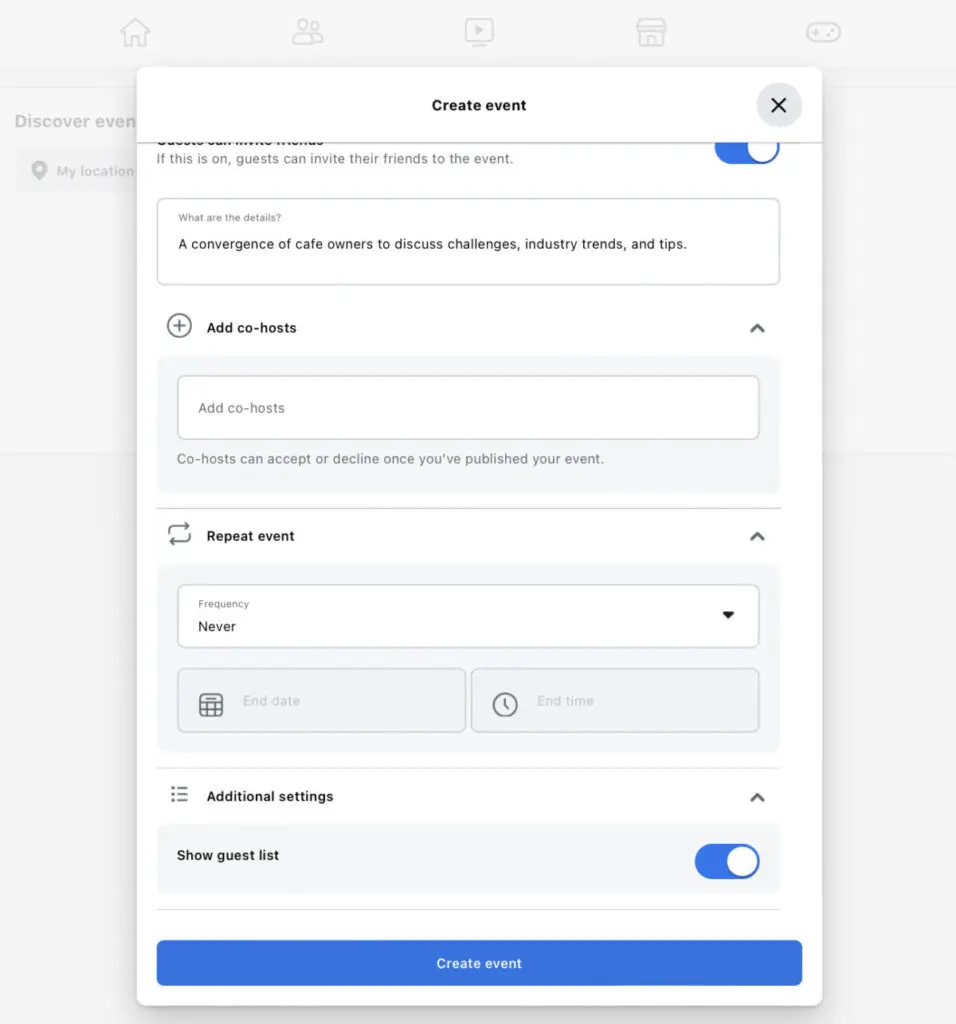
6. Once those details are decided, you can add more information about the event. Add a detailed description of the event including who it’s for, what topic will be discussed, what activities will take place, etc. Make sure to include details about the benefits people can gain from the event.
7. After that, you can further customize the event by adding a co-host (if you’re collaborating with another party) and deciding whether the event should be repeated. Facebook also lets you decide whether to display the guest list to other users. Once all these details are added, click on “Create event” to finish setting up your Facebook Event.
8. If you chose the option to keep your event private, you’d have to go through an additional step of inviting people. From your Event page, click on the “Invite Guests” button to invite people from your friend list and Groups. Alternatively, click on the “Invite” button above that. This will give you the option to invite attendees via email or SMS.

Creating an Event from a Facebook Business Page
1. Open the Facebook Business Page that you want to use to host your Facebook Event. Click on the menu button at the top right-hand corner of the screen and select “Events.”
2. Just like the Events page on your personal profile, you’ll be taken to a page where you can discover relevant Events. Click on the “Create New Event” button from the left-hand panel.
3. Next, it’s time to give your Event a name. Then select a date and time for your event to start. It’s also a good idea to include an end date and time so people get a better idea of how long they’ll have to spend at your event.
4. At the next step, you’ll have to select whether the event is taking place in person or virtually. In-person events will require a location. For virtual events, Business Pages can only choose between Facebook Live and external event hosting platforms. That means you won’t be able to host your event through Messenger Rooms.
5. Unlike Events created from your personal profile, Events hosted from a Business Page are automatically made Public. That means anyone can see and join the event even if they’re not on Facebook. You won’t have the option to customize your event privacy.
6. Next, provide more information about the event such as what it’s all about and who it’s for. Make sure to include key benefits of attending the event by listing takeaways and/or reasons to attend.
7. One of the most important steps is to choose your event category. Under the option to “Market your event”, click on the drop-down menu and choose the category that’s most relevant to your event.
8. Once all these key details are filled in, you’ll have the option to add co-hosts. This is a great option if you’re partnering with other Pages or with industry thought leaders and influencers. These co-hosts will show up among the list of hosts on your Event page.
9. Choose whether or not to repeat the event. You could set up a daily, weekly, or custom schedule for the event.
10. Next, customize the communication settings for your event. You can choose to show the guest list and allow only hosts to post in the Event. If you want to allow everyone to post, ensuring that all posts are approved by a host is crucial to prevent people from spamming or sharing unwanted content.
11. After finalizing all these details, click on “Create event.” Your Event page will be automatically set up so you can start promoting it.
How to Make Edits to Your Facebook Event
You’ve created an Event on Facebook with all the important details you want attendees to know. But at some point, you realize that you made a small mistake in your Event details. Or perhaps there are some last-minute changes you need to make. So how can you make edits to your Facebook Event?
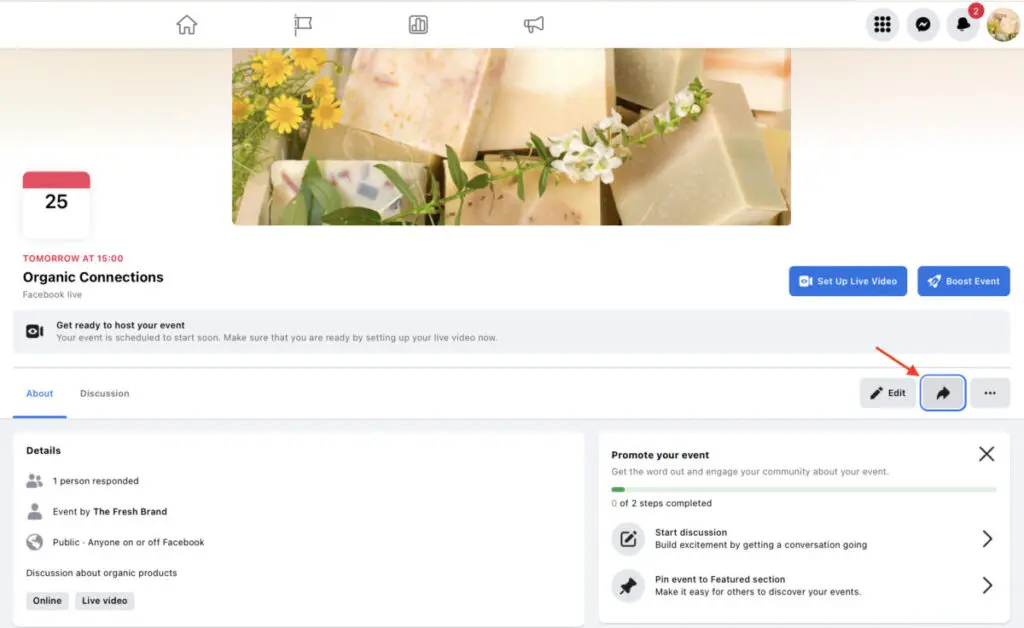
All you need to do is go to your Event page and click on the “Edit” button at the top right-hand corner of the screen right below your Event name. This will open up the option to edit details about the Event such as the name, timing, location, description, mode, and so on.
Options to Share Your Facebook Event
It’s not enough to simply set up your Facebook Event and hope for the best. You have to make sure that you get it in front of as many people as possible so you can drive attendance. That means sharing the Event so that more people can see and join it. The options to share a Facebook Event vary depending on whether it’s a public or private event.
Public Events
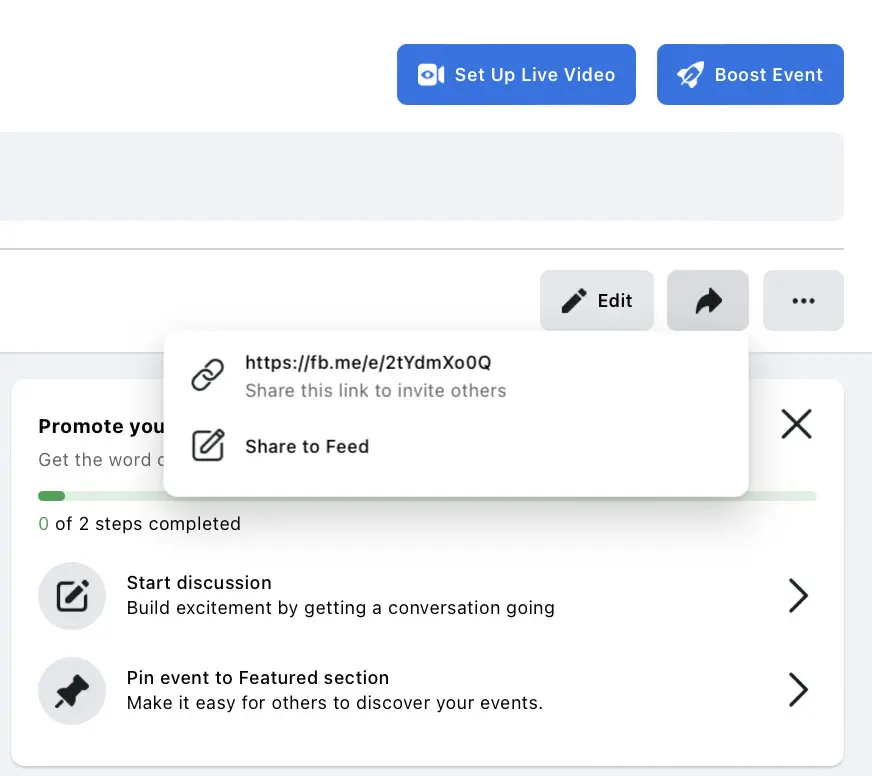
To share a public event, go to your Event page and click on the arrow button at the top right-hand corner of the screen. This will give you the option to share directly to your Feed, where all your followers can see the Event. If you choose to share to your Feed, make sure to include a captivating caption that will entice people to attend your event.
You’ll also have the option to share a link to the Event. If you choose this option, the link will be automatically copied to your clipboard. You can then paste this link and share it to Groups, messages, emails, and other social media platforms.
Private Events
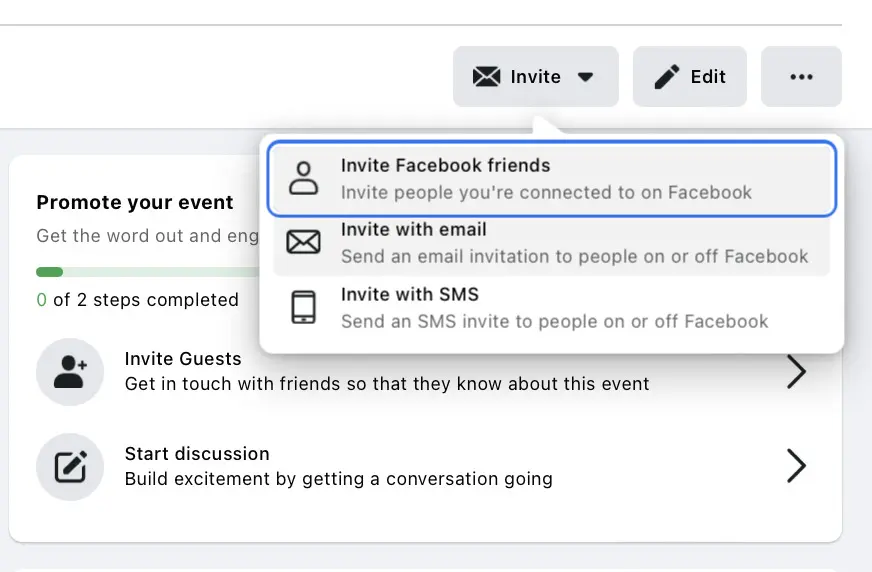
When it comes to sharing a private event, it will be done on an invitation basis since this option will only allow invited guests to see and attend the event. To send out your invitations, click on the “Invite” button at the right-hand corner of the screen right below the Event name. This will open a drop-down menu giving you the option to invite your Facebook friends or send out invites via email or SMS.
With the first option, you just need to choose the friends you want to invite to the event. However, you’ll need email addresses or phone numbers to invite people via the other two options.
Get Ready to Host a Facebook Event
Events are a great way to build a community of engaged people. Make the most of the Facebook Events feature to promote your in-person and virtual events and use the latest marketing tactics to get the event in front of a massive audience.
Frequently Asked Questions
How do you get Events on Facebook?
From the menu button on your Facebook homepage, select the “Events” to discover events that are relevant to you.
How do you set up an Event on Facebook?
You can set up an Event on Facebook by clicking on the “Create New Event” button on your Facebook Events page and filling up all the details about the event.
Why is Facebook not letting me post in an Event?
Depending on the Event settings, you may be unable to post in an Event because you’re not a host. Alternatively, your post may need to be approved by a host before it’s published on the Event page.
How do I invite people to a Facebook Event?
Go to your Event page and click on the Invite button to send invites to your Facebook friends, mailing list, or contacts.
Why can’t I add an Event to a Facebook Group?
If you can’t add an Event to a Facebook Group, it’s likely because the Group admins don’t allow such types of posts.


