
In some ways, Instagram Stories could be considered a Snapchat killer. It is the Facebook-Instagram company’s answer to their “blink, and it’s gone” opposition. In this article, I will show you how to use Instagram Stories like an expert.
Like Instagram itself, Instagram Stories are snowballing in popularity. In 15 Mind-Blowing Instagram Statistics, You Don’t Know, we looked at this rapid growth.
Instagram introduced the Stories functionality on August 2, 2016, directly competing with Snapchat. This feature allows users to share sequences of photos and videos that vanish 24 hours after being posted. Within a few months of its launch, 100 million users began engaging with it daily. Surpassing Snapchat's 150 million Daily Active Users (DAUs), Instagram achieved this milestone just eight months after introducing the feature.
- Why Would a Business Want to Use Instagram Stories?
- Creating an Instagram Story
- Monitor Who Sees Your Story
- Selecting Who Can and Who Cannot Reply to Your Story or Share It
- Deleting all or Part of Your Story
- Saving Pictures or Videos to Your Camera Roll
- Adding Pictures or Videos from Your Camera Roll
- Zoom When Creating a Video
- Adding Filters
- Drawing
- Changing Pen Colors and Styles
- Adding Color Overlays
- Drawing Polka Dots and Stripes
- Adding Stickers
- Adding text
- Tagging People
- Dual Captions for a Shadow Effect
- How to Layer Captions
- Different Shaped Captions
- Adding Links
- Adding Music to Videos
- Shoot Vertically
- Using Your Phone’s Native Camera
- Frequently Asked Questions
Why Would a Business Want to Use Instagram Stories?
Instagram Stories allows you to tell more of your story than any album of individual photos on Instagram can. You could choose to do this yourself, or for maximum effectiveness, you could work with favorite influencers to tell your story.
This is particularly relevant to any marketer. One of the first things they teach you in business is that you need to tell your story to potential customers. Instagram Stories lets you do precisely that – using a combination of pictures and videos.
Of course, they are temporary. They vanish after 24 hours. But that should be perfect for story-telling. If you were to tell a story in real-life, it would usually cease to be news after 24 hours. You don’t want to be that old uncle wheeled out at Christmas to repeat his stories time after time. Instagram Stories forces you to tell fresh visual tales about your business on a regular basis.
Another advantage of Instagram Stories is that you do not clog up your audience’s feeds. There is a fine line between being proactive and being spammy on social media. If people begin to complain that your posts dominate their feeds, you know you have a problem. Instagram Stories, however, don’t appear in peoples’ timelines, so there is no risk of you being considered spammy.
Instagram Stories provide an excellent opportunity for you to show your (or your influencers’) creativity to your target audience. These are not just click-post-and-hope images, which brands sometimes upload. Instagram Stories are a combination of images and videos that work together, along with any necessary commentary overlay, to tell today's story.
Having a 24-hour deadline has another advantage. Your content is there for a day, highlighted, and then gone.
As much as you use SEO to try and build your search engine ratings, there are pages that you wish would disappear quickly. For instance, the copy you upload for tomorrow’s one-day sale will be useless in two days time. It can be awkward if it ranks in Google and people click on it in six months time. At least there is no danger of that happening to your Instagram Stories which can promote your sale to a broad audience today, and vanish forever tomorrow.
Creating an Instagram Story
The exact method you use depends to some extent on the app/device you use to access Instagram. Most people, though, access Instagram via their smartphone app.
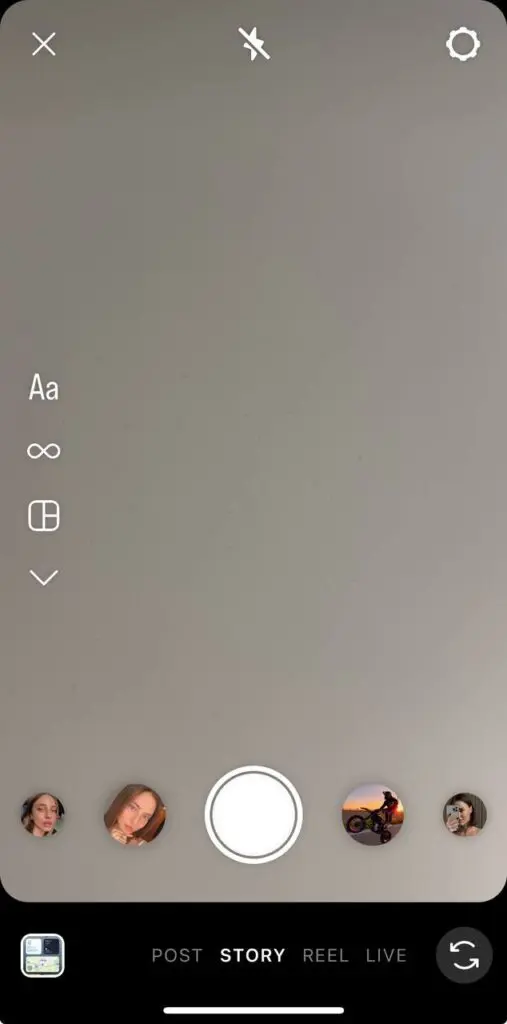
In this app, you create a story by pressing the ‘+’ symbol on your name in the top left. If you have not already done so, give permission for Instagram Stories to use your camera and (if you want sound) microphone.
Tap the circle button in the center at the bottom to take a photo. Hold it down if you want to make a video. This is called Normal mode.
Alternatively, select one of the other options at the bottom of your screen:
- Live - as it suggests, Live mode means you are filming and broadcasting on Instagram now. You have the opportunity to include this in your Instagram Story for 24 hours.
- Boomerang – you film and record a GIF that loops for up to three seconds
- Superzoom – lets you zoom in closed on your subject and enables you to create a soundtrack to accompany your video
- Rewind – you create a video that plays in reverse
- Stop-Motion – you can generate stop-motion videos that playback as one seamless video
- Hands-Free – takes a 15 second video without you having to keep your finger on the circle button
You can begin Your Story instantly by pressing the Your Story button at the bottom. Alternatively, you can pick Next which sends you to a screen where you have the option to include the picture/video as part of Your Story or send it to particular people.
Note
If you currently have a story in action, your profile picture appears intact at the top left. If you do not have a story already started, the blue “+’ will overlay the bottom right section of your image.
Monitor Who Sees Your Story
If you select Next when you take a new picture or video for your story you are taken to the Share screen. You can save this to your story, and allow anybody to see it. Alternatively, you can pick from your list of followers. Instagram makes suggestions of people to send to at the top of the list. If you select specific people along with Your Story, Instagram sends your story separately to those you name.
Once you have begun your story, and you click on Your Story, Instagram gives you the option to add to the story. At the same time, you will see three dots in the bottom right corner. These are the story settings.
One of the story settings is “Hide story from.” If you click on this, your list of followers appears, and you can select those you want to avoid seeing your story. When finished making your selections, click on Done.
Selecting Who Can and Who Cannot Reply to Your Story or Share It
If you clock on the three dots to get to your Story Settings menu, you are given several choices regarding replies and messaging.
You have three options for who can reply to your story:
- Everyone can share it
- Only people you follow can share it
- Nobody can share it
The Story Setting menu provides you with the option whether to allow sharing or not.
Deleting all or Part of Your Story
Another option offered if you click on the three dots in the bottom right corner is to Delete. You are then asked to confirm whether you want to delete a particular video or image from your story.
You can delete as many images or videos as you choose, including the entire story.
Saving Pictures or Videos to Your Camera Roll
If you wish to keep your images or videos, you have an option to add them to your camera roll. You have an icon to Save at the bottom of the screen when you take the photo or make a video.
Alternatively, you have the option in the Story Settings menu to select Save to Camera Roll. If you choose this option, Instagram automatically saves photos and videos to your camera roll when you add them to your story.
Adding Pictures or Videos from Your Camera Roll
There will be times when you want to add existing images to your story, rather than adding new live content.
You can either do this by swiping your screen down, or by tapping on the icon at the bottom left of the screen, for your latest media. It usually restricts you to pictures/video that you have taken in the last 24 hours. You can get around this by freshly uploading content.
If you have uploaded content created on another device, remember that the ideal size is 1080 x 1920 pixels. Videos should have a 9:16 ratio (if vertical) and be up to 15 seconds long.
Zoom When Creating a Video
While you are recording your video, you can swipe up, and you will see your video zoom in. Swipe back down, and your video zooms back out again.
Adding Filters
Instagram Stories provides you with a range of different filters. Once you have a new picture or video, you can swipe right to find filters to modify your creation. These go by place names. For instance, Instagram calls the first filter you see Lisbon which turns everything a vivid yellow shade. If you want a black and white effect, try the Tokyo filter. Appropriately, the Melbourne filer gives a sun-drenched washed-out look.
Drawing
If you click on the pen icon at the top right, you move to a screen which gives you the chance to draw on your image. It is like having a marker pen to write on your picture (or on your tv screen in the case of a video).
You draw with your finger, hopefully showing some form of artistic ability, rather just being a master scribbler.
Changing Pen Colors and Styles
You can alter your pen types and colors. You can also delete your mistakes with an “eraser.” Probably the most important control is the Undo button in the top left, where you can remove your last few actions, a tap at a time.
At the bottom of your image, you will see a range of colored dots. There are three sets. The first set shows the core colors – white, black, blue, green, yellow, orange, red, magenta, and violet. You can flick these across to find another nine colors – mainly skin tones, and nature colors. You can flick across again for nine shades of gray.
To the left of the colors is an eye dropper. You can use this to sample a color from your image and then make your text the correct color to match it.
You gain access to a more extensive selection of colors by holding down one of the color buttons. This allows you to select almost any color imaginable from a color-grid.
You have three choices at the top of the screen for pen type, as well as the eraser.
You have a slider on the left (a triangle with a dot that moves up and down). If you slide the dot down, you draw narrow lines. Moving the dot up, lets you draw broad lines.
Adding Color Overlays
One unusual effect is to overlay your entire screen with a color of your choice. To do this select the color you want and hold down the colored icon until your screen turns the selected color.
If you create your overlay by pressing when you are using the pen icon, it will be an opaque overlay. If you make your layer by pressing when using the marker icon, the overlay will be translucent.
You can then open up part of your image, by wiping with the eraser tool. This clears a section of your picture. With a video, it has the effect of looking like somebody painted your television screen and you have wiped away part of the paint away.
Note
You can add captions and emoji over the top of your layer if you choose.
Drawing Polka Dots and Stripes
You can add polka dots to your image by tapping it with the pen tool (having selected the color you want first). You can create stripes the same way, but using the angled marker tool.
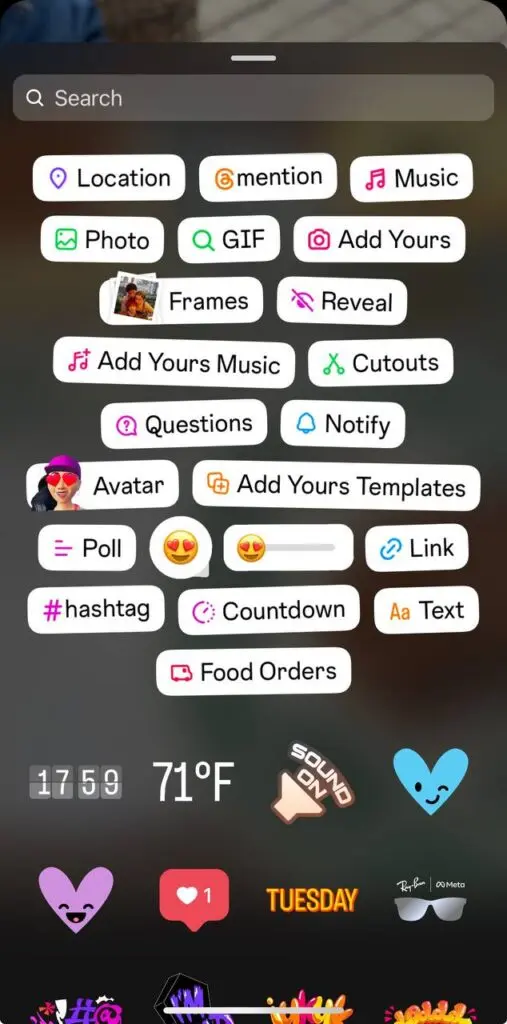
Adding Stickers
To add a sticker click on the square happy face icon at the top of your screen. You will see a range of different types of stickers, including a geolocation tag. Once you pick a sticker, you need to hold it down to attach it to your image (as you would a real sticker).
Other useful tags include the time, temperature, day, hashtag, and a wide range of other stickers. You can even take a selfie to incorporate as a sticker within your face. A picture of your head bobbing around within a video of yourself talking makes for a disconcerting two-headed image!
You can modify the size of any sticker by pinching it and moving it in or out with two fingers.
You can even pin a sticker on a moving part in a video, which shows how much technology has advanced in recent times. That would have taken a high-end video editing suite a few years ago.
If you decide you don’t like a sticker, drag it to the garbage bin icon to get rid of it.
Note
Instagram creates new stickers regularly, including seasonally themed ones.
Adding text
You can add text to any image by clicking on the “Aa” icon in the top right corner. This brings up an onscreen keyboard where you can write any text you want to overlay your image.
Instagram Stories has surprisingly strong text capabilities.
You type text using the same keyboard you use for most of your other applications. It includes a microphone so that you can dictate your text.
You can change the justification by repeatedly pressing the top-left icon. It begins as left justified, but by pressing the icon, you can turn it into right justification or centered.
You can even kern your text. There is an upside down triangle with a circle on it to the left of your text. If you move the circle up or down, you increase or decrease your font size. You can achieve the same effect after you have placed your text, by using two fingers to increase or decrease your text size.
If you move the circle on the triangle left or right you kern your text. Moving the triangle rightwards spreads your text out. Shifting it leftwards tightens your text together.
Instagram Stories shows you the same selection of colors in the Text section – three bands of colored dots, at the bottom of the screen – as is does in the Drawing part. You can change your pen color by clicking on the color of your choice. You have the eyedropper which you can use to sample the background of your image for a matching text color.
In the top center of your screen, you will see an icon of an A inside a square. You can click this multiple times to get the combination you want:
- Colored text on a clear background
- White text on a colored background
- White text on a translucent colored background
You can pin text, stickers, or anything else you add to your video by holding it down and then choosing the Pin option. This means that your text (or another item) moves along with whatever you pinned it to in your video.
Tagging People
You can tag selected people by typing the @symbol and follow this with their Instagram handle. Instagram will suggest people as you type characters. When you see the person you want, click on his or her image to tag him/her. You will see his/her tagged name is now underlined.
Dual Captions for a Shadow Effect
To do this begin by creating a text caption for your image in the usual way. Position it where you want it on the image. As this first layer makes up the shadow, it works best if you make it a neutral black or white color.
Then repeat your caption in your primary text color. Make sure you type it the same. Don’t alter your size or kerning at all.
Now shift your second layer of text over the first, but slightly askew.
How to Layer Captions
You can create an interesting effect by layering captions over each other.
Create your first text caption, and any other decoration your intend to add. Click Save in the lower left corner (saving to “The Story” when prompted). Then, select the photo you just saved and layer another caption over the first. You can repeat this as many times as you want to achieve the effect you are after.
Different Shaped Captions
By default, if you choose a colored background for your text it will be rectangular. Perhaps you would prefer a different shape, for instance, a round caption bubble like in a comic.
The easiest way to achieve this is to draw the shape you want with your pen. Position it where you want. Then go into text mode and create your caption – but choose to make it with colored text on a transparent background. That way, you can overlay the text onto your shape– creating a custom-shaped caption.
Adding Links
Instagram Stories gives you a better opportunity to include links than the rest of Instagram. If you have a verified account, you can add a link in your story leading to your landing page or blog. Once you have added at least one image or video to your story, click on the paperclip icon. This gives you the chance to add your chosen website URL.
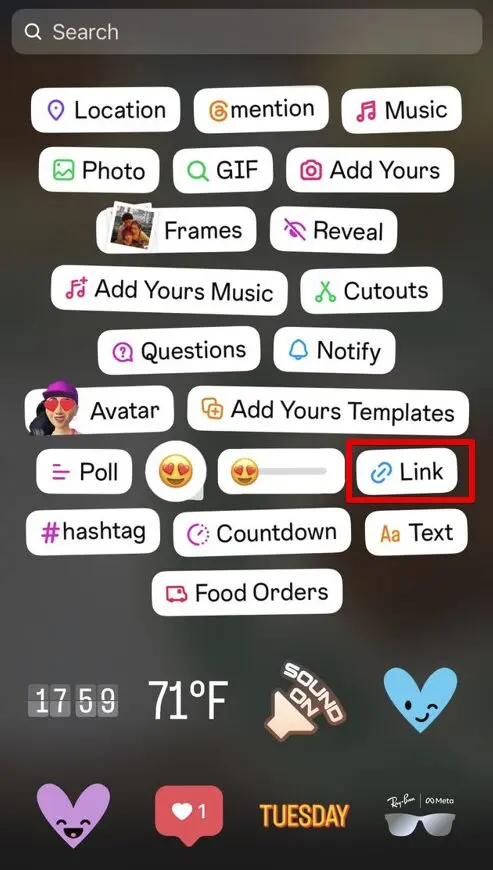
Once you add that image to your story, you will see a message saying “swipe up,” and people can find your URL by swiping up.
Of course, you can also use the drawing (or sticker) feature to draw attention to the fact that people need to swipe up to find your link.
Adding Music to Videos
To add music to your clip, either stream some music or open up your Music app and play a track on your device. You can then record this as part of a video which you can add to your Instagram Story. Make sure that the speaker icon at the top of the screen isn’t muted. If it is, tap it to unmute it.
Shoot Vertically
With Instagram being predominantly a mobile app, you should follow Snapchat’s lead and shoot your videos vertically. People often can’t be bothered rotating their phones for a horizontal app.
Using Your Phone’s Native Camera
The photos and videos taken in the app are not usually as high quality as those shot in your device’s native Camera app. You could begin by taking your images there and making any edits using your editing software. Once you are happy with these, you can then upload them into Instagram Stories, making any further adjustments you want.
If need be, crop your photos with your phone’s editing function before you transfer them into Instagram Stories.
Instagram Stories are a feature that allows users to share sequences of photos and videos that disappear after 24 hours. Unlike regular Instagram posts, Stories do not appear in the main feed but are instead displayed at the top of the app. This feature encourages frequent and creative content sharing without cluttering followers' timelines. Businesses should use Instagram Stories to engage with their audience more dynamically and personally. Stories offer a way to share behind-the-scenes content, promote time-sensitive offers, and interact with followers through polls, Q&A sessions, and other interactive features. They also help in telling a brand's story in a more authentic and engaging manner, without the permanence of regular posts. To create an Instagram Story, open the Instagram app and tap the camera icon in the top-left corner of the screen. You can take a photo or video, or choose one from your camera roll. You can then add text, stickers, filters, and other effects before sharing the Story. Once you're ready, tap "Your Story" to share it with your followers. Yes, you can control who sees your Instagram Stories. In the Story settings, you can choose to hide your Story from specific followers and decide who can reply to your Story. Additionally, you can share your Story with a select group of people using the "Close Friends" feature. Instagram Stories offer several interactive elements such as polls, question stickers, quizzes, and sliders. To add these, create your Story and then tap the sticker icon at the top of the screen. From there, select the desired interactive element, customize it, and place it on your Story. These features help boost engagement and allow for direct interaction with your audience.Frequently Asked Questions
What are Instagram Stories and how do they differ from regular Instagram posts?
Why should businesses use Instagram Stories?
How can I create an Instagram Story?
Can I control who sees my Instagram Stories?
How can I add interactive elements to my Instagram Stories?
SUGGESTED

A Complete Guide to Instagram Stories Analytics
Arguably the single most significant reason for Instagram’s recent stellar success has...

11 Instagram Stories Hacks You Need to Know
If you or your brand have an Instagram account and have been wondering how to get more...

How to See Your Instagram Stories Views in 3 Easy Steps
Want to know if your Instagram Story is getting any views? Here’s how you can see how...