
Instagram Stories may have been initially introduced to steal the thunder of Snapchat. But they have almost taken a life of their own. They are arguably the most successful feature of modern Instagram. Over 500 million people use Instagram Stories every day, and 86.6% of Instagramers post Instagram Stories. While most people realize that you can include multiple photos across different slides in your Instagram Story, fewer know that you can also add multiple images as a collage on one slide.
In this post, we will look at the various ways you can add multiple photos to a single Instagram Story.
How to Add Multiple Photos to Your Instagram Story:
Why Share Multiple Photos / Videos to Instagram Stories at Once
Sometimes when you are doing something special, you take a lot of photos that you want to share with your friends on Instagram. Sure, you could make a whole series of standard Instagram posts, sharing a single image in each post. But you are far more likely to interest your audience if you combine them into a unique Instagram story.
It makes sense, as you can use a single Story to tell the visual "story" of your event, trip, or other activity. You can even create Instagram Stories showcasing your activities on a particular day and include all the relevant images of that day to tell your tale.
Adding Multiple Images to a Single Instagram Story
There are a couple of ways that you can ad add multiple images to a single Instagram Story, both of which you can do from within your Instagram app. The first way effectively adds a series of ‘slides" to your Story, each with a different image.
There is a second way, where you can add additional images as a collage so that you can see all your pictures in one screen.
Adding Multiple Photos to Your Instagram Story as Separate "Slides"
Step 1: Open Instagram Stories
Begin by tapping the camera icon in the top left of your Instagram app. You will need to have some Instagram stories awaiting your viewing for this to appear, however. If you don’t have a series of Instagram Stories sitting at the top of your app, you can reach the same place by clicking the Plus symbol on your Instagram profile icon. This will open up the Instagram camera, which is initially your front-facing (“selfie”) camera.
Step 2: Select Your Photos / Videos
You can choose to take new photos for your Instagram image if you wish. If so, frame your intended photo image and take your picture.
Alternatively, you can go into your photo library/photo roll to find existing photos on your device. You will find the icon for your photo roll as the leftmost of the bottom icons. Tap on this and your photo roll will open, with your latest pictures showing first. You should also see a button at the top right of this screen with the label, SELECT MULTIPLE.
You can now work your way through your images, clicking the ones that you want to include in this Story. Each time you click on an image, a number will appear in the top right corner of it. This indicates the order in which your photos will upload.
Once you have selected all the photos you want to include, tap on the NEXT button in the bottom right. You can then cycle through each picture you have chosen. If you are unhappy with the order of your images, you can go back in. Deselect the pictures you wish to alter, and then reselect your chosen photos in your preferred sequence.
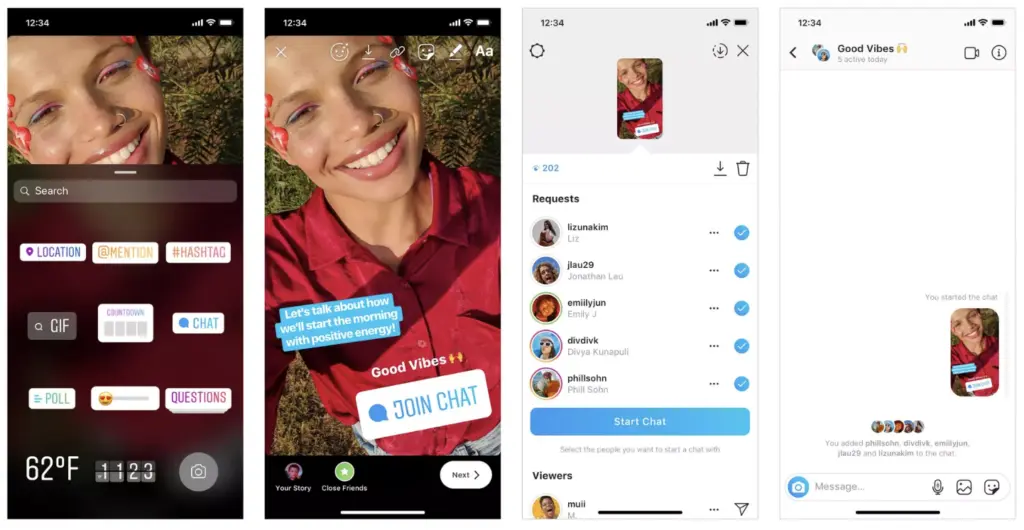
Step 3: Add Any Additional Elements
At this point, you are given the option to play around with the multiple photos you intend to use in your Instagram Story. You can add different filters to each image (by swiping right on each image and selecting your preferred filter). You can also add stickers for such things as hashtags and locations.
Thanks to Instagram continually adding to their Sticker features, you have a long list of extra elements you can add to each photo. These include both Instargam overlay stickers and special-purpose Instagram Stickers.
Instagram overlay stickers are graphic designs you add to an image, mainly to improve its appearance. They can be as simple as flowing lines, flowers, pastel brush strokes, simple illustrations, or lightning bolts. Alternatively, you could design overlay images yourself, or buy pre-made packs.
Of course, you don't want to overdo your use of stickers and filters. Theoretically, you could virtually wipe out all trace of the original images with stickers, which makes you wonder what the point would be. Most designers believe that "less is more." Only add stickers to your pictures when they make sense and add to the overall visual appeal.
Instagram now offers quite a few special-purpose Stickers that you can separately add to each of the pictures in your Story. In most cases, they add a feature that encourages the viewer to interact in some way with your Story. Of course, in some cases, it would be nonsensical to add particular Stickers to more than one image in your Story, so add these with discretion.
Source: theverge.com
Some of the specialist Stickers made available by Instagram include:
- Chat Sticker (probably not one you would put on more than one image)
- Donation Sticker
- Quiz Sticker
- Countdown Sticker (having multiple countdowns in one Story would probably be confusing)
- Questions Sticker
- Music Sticker
- Poll Sticker
- Emoji Slider Sticker
- Location Sticker
- Hashtag Sticker
- Current Time Sticker
- Weather Sticker
Once you are satisfied with the look of each image, you can once again tap NEXT, and move onto publishing your Instagram Story.
Creating a Photo Collage in Instagram Stories
This method involves adding images to your Instagram Story using an Image Select Sticker, in much the same way that you add music to your Story using a Music sticker. Judging from the comments online, many people believe that Instagram has released a new Photo Sticker, but that isn't true as yet. You are going to paste multiple pictures into a single background image. The idea is that you add pictures using the Image Select Sticker numerous times. You might, however, have times when you can include a Selfie Sticker to your Story if you can make use of an image taken with your front camera.
While this process is straightforward on iOS phones, it appears that it is not as simple on Android phones. You may first need to download an app, such as Swiftkey Keyboard, to make it possible.
Step 1: Create Your Background
You begin the process by opening your Instagram Stories app. If you are going to have multiple images appear on one screen, you first need to create a background,
You can do this by taking a photo to use as your background. It must be a still image, as videos don’t work.
Once you have your background image, you can play around with it. For example, you can add a colored background by using your Brush tool, pressing, and holding a color swatch at the bottom of the screen to select a color. You press and hold the screen with your finger to fill it with the color chosen.
If you want a black background, all you need do is cover up the lens of your camera when you take the photo.
Step 2: Collect Each Photo from Your Camera Roll
You will need to go through Steps 2 and 3 in sequence for each photo. You can’t use video clips or GIFs for this. You can use any still image at this point. It doesn't have to be a photo as such. It could be a logo or a screenshot, for instance. You will have to first make sure that you have saved the relevant images on your camera roll.
Open your camera roll to find an image you want to add to your Story. Tap on the photo to gain a full preview, and then tap the Share icon. Select Copy to copy that photo to your clipboard.
You can use any still image at this point; it doesn't have to be a photo as such. You could select a logo or a screenshot, to add into your overall collage, if you like.
Step 3: Add Each Image to Your Instagram Story
Return to Instagram Stories. Bring up your background image. Look for the sliding pop-up in the bottom left corner, and tap on Add Sticker to paste in the photo you just copied to the clipboard. Then click Done. The Add Sticker pop-up only lasts a short time, so you may have to repeat this if you are too slow selecting it.
You can then resize, rotate, or move the selected image anywhere within your larger background image.
You can now repeat Steps 2 and 3 to add multiple photos to your Story.
Step 4: Add Any Additional Effects
You can add effects to your Story with collated images in much the same way as described above. In this case, you are effectively altering just one combined image, of course, rather than multiple "slides." It is best to think of this as one complete image (hence the "collage" name), so you will add stickers to the overall picture.
You can click on the individual photos to change your layout arrangement, however.
SUGGESTED

Acceleration Partners Names Suzannah Tarkington VP of Influencer...
Influencer and affiliate marketing have traditionally occupied different corners of the...

Intuition Media Group Launches Rebrand and Proprietary IC4...
Intuition Media Group, an independent women-owned influencer marketing agency, has...

What Conversion Data From 10,000+ Creator Storefronts Reveals...
Brands running creator programs are seeing conversion rate lifts of 30%, 40%, even 214%...