
You may be marketing your brand on Instagram, but if you’re not yet running ads on the platform, you could be missing out. According to the latest Instagram stats, the platform has an ad reach of 1.45 billion, and 95% of users use it to discover new products or services. So you have the potential to exponentially grow your reach and get your brand in front of millions of people.
This post will serve as a guide to using the Instagram Ads Manager to create and run powerful ads for your brand. Let’s get into it.
Getting Started with Instagram Ads Manager
As Instagram is owned by Facebook, the Instagram Ads Manager is really just the Meta Ads Manager. You can create, run, and manage ads for both Facebook and Instagram from here. To display your ads within the Instagram platform, you’ll need to select Instagram as a placement while creating your ad.
Before you begin, you need a Facebook Page to log into the Meta Ads Manager. You can then use this Page or your connected Instagram professional account to run your Instagram ads. That means if your brand already has an Instagram account, you need to connect it to your Facebook Page or add it to your Business Manager. Even if you don’t have an Instagram account, you can still run ads by using your Facebook Page to represent your brand on Instagram.
Here's a checklist of essentials that you need for running an Instagram ad.
- If you’re running an ad with your connected Instagram account, make sure it’s a professional account and not a personal account.
- Set up a payment method in your Ads Manager account.
- Have a clear idea of what you wish to achieve by running your Instagram ad.
- Be prepared with the media and creative you want to use in your ad.
How to Use Instagram Ads Manager in 10 Easy Steps
Once you have your Ads Manager account set up and completed the checklist provided above, you can get started with the actual steps of creating an ad. Follow these 10 steps to use the Instagram Ads Manager.
Step 1: Choose a Relevant Objective
Log into your Ads Manager account and click on “Create.” This will open up a window with the option to choose your campaign objective. It’s important to choose an objective that not only aligns with your goals but also supports Instagram as an ad placement.
Currently, Facebook offers six different campaign objectives–sales, leads, engagement, app promotion, traffic, and awareness. All six of these objectives support Instagram as an ad placement. However, there may be some placement limitations depending on the objective. For example, your ad can’t show up in the Instagram Shop tab with awareness, engagement, and app promotion objectives.
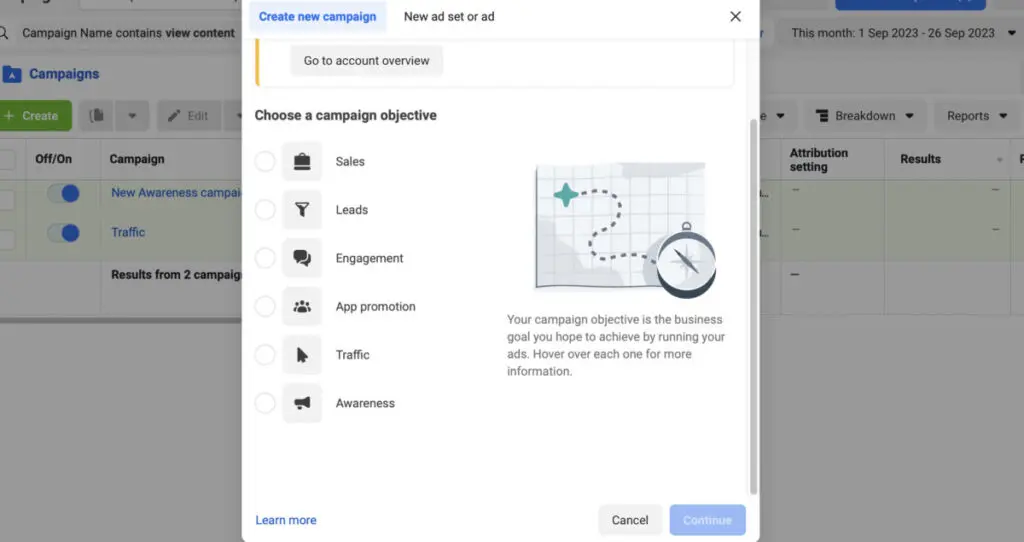
Choose the objective that best aligns with your goals and click on “Continue.” A business that’s just building its presence on the platform might want to go for the awareness objective whereas the sales objective may be ideal for those who want to ramp up their revenue.
For this example, we’ll select the traffic objective. The specific steps that follow may vary depending on the objective you choose. However, we’ll try to focus on the key steps that will remain more or less similar regardless of your objective.
Step 2: Choose Your Conversion Location
Your campaign will be automatically created once you complete the previous step. On the campaign page, add a name for your campaign and choose whether your ad fits any of the special categories. Ads related to credit, housing, employment, social issues, politics, and elections all fall under special categories. These requirements may vary depending on your country.
Click on the ad set tab on the left-hand panel and create a name for your new ad set. Then choose the conversion location that you want. Conversion location refers to the location where you want the desired action to take place. For this example, we’ll choose “website” as a conversion location, which means that we want to drive traffic to the website.
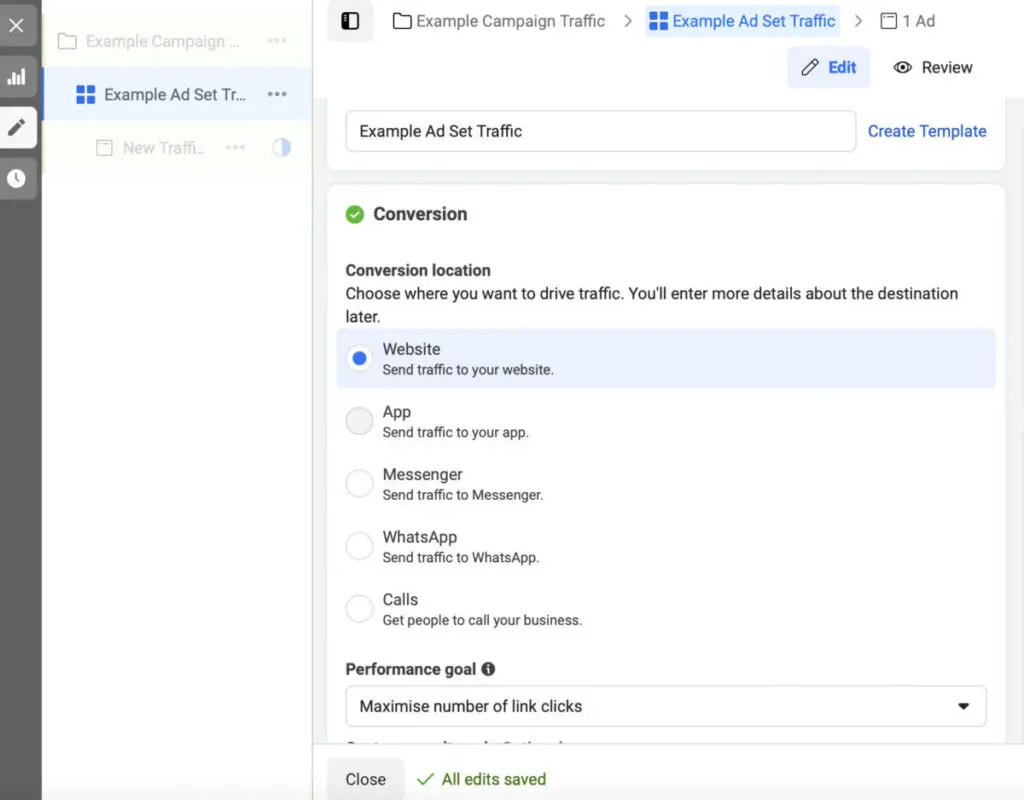
Depending on the conversion location, you’ll also have the option to choose your performance goal. In this case, we have the option to choose either to maximize the number of link clicks or the number of landing page views. Optionally, you can enter your cost-per-result goal if it’s important for you to maintain an average cost-per-result of a certain amount.
Step 3: Decide Whether to Use Dynamic Creative
For some conversion locations, you’ll have the option to use dynamic creative. If you turn on this option, you need to provide variations of creative elements such as text, audio, videos, and images. Facebook will then use these to automatically deliver a dynamic combination of creative elements optimized for your audience. It will mix and match elements to generate variations of different templates, formats, and audio to use in your ads.
Turning on dynamic creative is the perfect way to personalize your ads for each person who views it. This can significantly enhance your ad performance, so consider experimenting with it if you have the option.
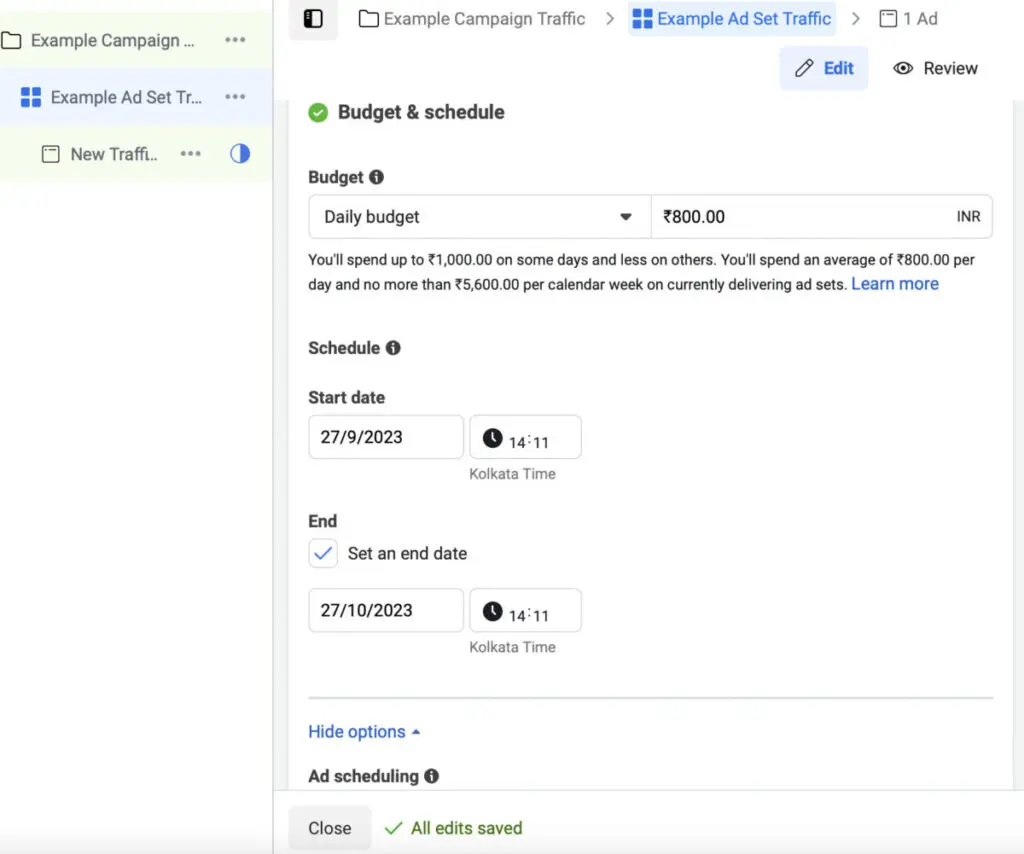
Step 4: Set Your Budget and Schedule
The next step involves setting a budget and schedule that works for you. If you set a daily budget, Facebook will optimize delivery to ensure that you spend no more than the set amount on average per day. This means that although you might exceed the daily budget on some days and spend less on other days, the average daily spending will not exceed the set amount.
If you set a lifetime budget, you won’t spend more than the set amount during the lifetime of your ad. That means you will spend more on days that offer more opportunities and less on days that offer fewer opportunities. You can choose a budgeting option that works best for you or even experiment with each option to see which one is ideal for your needs.
Setting a schedule for your ad is also an important step. Otherwise, you might end up running the ad long after the campaign is supposed to end. Imagine your audience seeing an ad related to your summer promo when it’s already time to bring out the Halloween decorations. It’s no longer going to be relevant to them, and you’re still spending money on a campaign that’s already ended.
Step 5: Define Your Target Audience
One of the most crucial steps involves defining the type of audience you want to target with your Instagram ads. If you already have a saved audience, you can also use them for this campaign. Alternatively, you have the option to create a new custom audience or a new lookalike audience.
When you choose to target a lookalike audience, you’ll be able to reach people who share similar characteristics as your most valuable audiences. This option involves selecting an audience or data source from which Meta will create your lookalike audience. For example, you can choose a lookalike audience based on the existing followers of a different Facebook Page you’re managing.
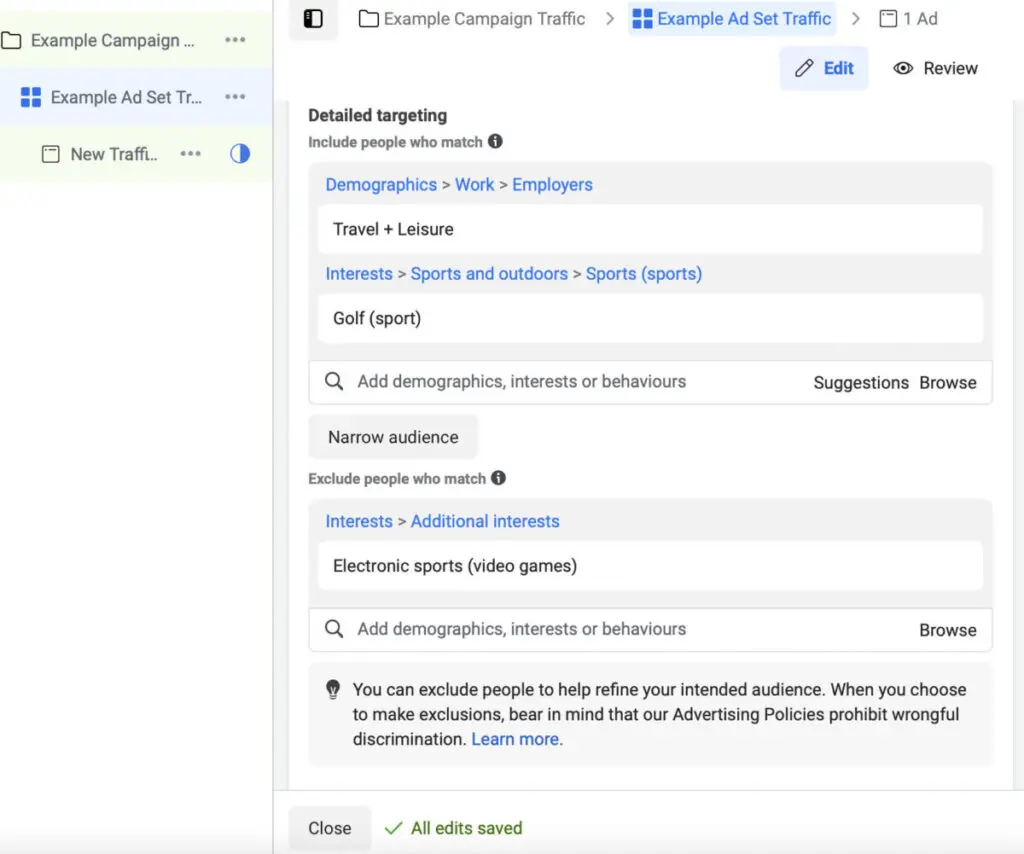
If you’re creating a custom audience, you can reach people who’ve already interacted with your business in some way. Meta also lets you customize their characteristics based on location, age, and gender. You can narrow your audience with more detailed targeting that allows you to include people who match specific demographics, interests, or behaviors. Plus, you can exclude people who match specific demographics, interests, or behaviors to further refine your audience.
For example, let’s say you sell custom golf clubs, and you want to reach people who would be interested in buying. In this case, you’d want to specifically target people who have shown an interest in golf. You can further narrow your search to exclude people who play golf only through video games.
Additionally, Meta lets you choose the advantage detailed targeting option. If this option is checked, the platform will automatically show your ad to people beyond your targeting selections when there’s a chance it will improve performance.
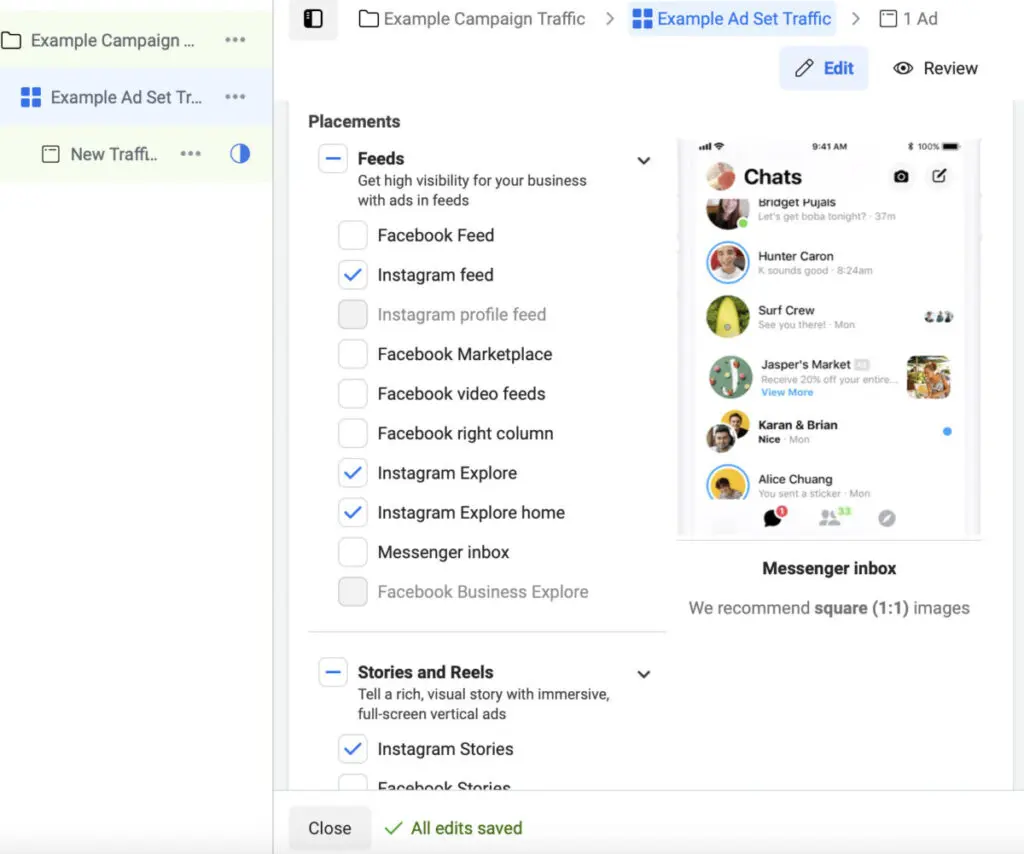
Step 6: Decide on Placements
Finally, it’s time to choose your placements. Meta lets you select Advantage+ placements to maximize your budget by displaying your ad across multiple placements where they’re likely to perform best. However, this means you have no control over where your ad is shown.
If you want to specifically display your ad on Instagram, choose the manual placements option and check the box next to Instagram. When you check the other boxes, your ad will also be displayed on those platforms.
Then select the specific placements that you want to use for your Instagram ad. By default, the Ads Manager will pre-select all the available ad placements for Instagram including feed, Explore, Explore home, Stories, Reels, and search results. For some campaign objectives, ad placements on the Instagram Shop tab will also be available. You can customize this selection to exclude some of the placements.
Step 7: Customize Your Ad Setup
Once you’ve selected your desired placements, click on “Next.” This will take you to your ad customization page where you can add a name for the ad and customize the settings. If you’re running the ad in partnership with creators, brands, or other businesses, make sure to toggle on the “Partnership ad” option. When this is turned on, both identities will be displayed in the header.
Next, select the identity you want to use for running your ad. It’s mandatory to choose the Facebook Page that you want to associate with the ad. If you have a connected Instagram account that you want to use for running the ad, make sure to select it from the drop-down menu.
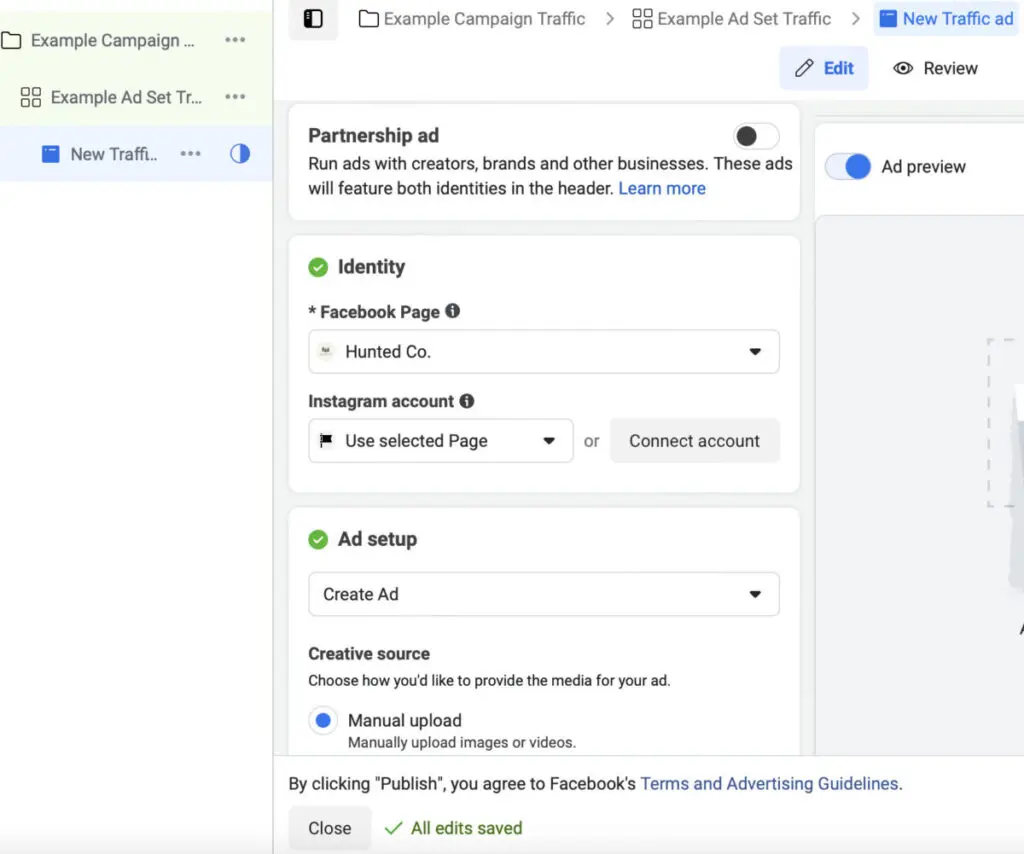
After this, you’ll need to select your ad setup. You have the option to create a new ad from scratch, use an existing post, or use a Creative Hub mockup. If you choose to create the ad, you’ll need to manually upload images or videos to use in your ad. Those with a product catalog will also be able to choose the option to automatically display the most relevant products from their catalog to each user.
Then select the format that works best for your ad. You can display your ad as a single image or video or as a carousel post displaying two or more scrollable images or videos. For showcasing products, you may also want to use the collection format where a group of items are displayed, which will then open into a full-screen mobile experience upon interaction.
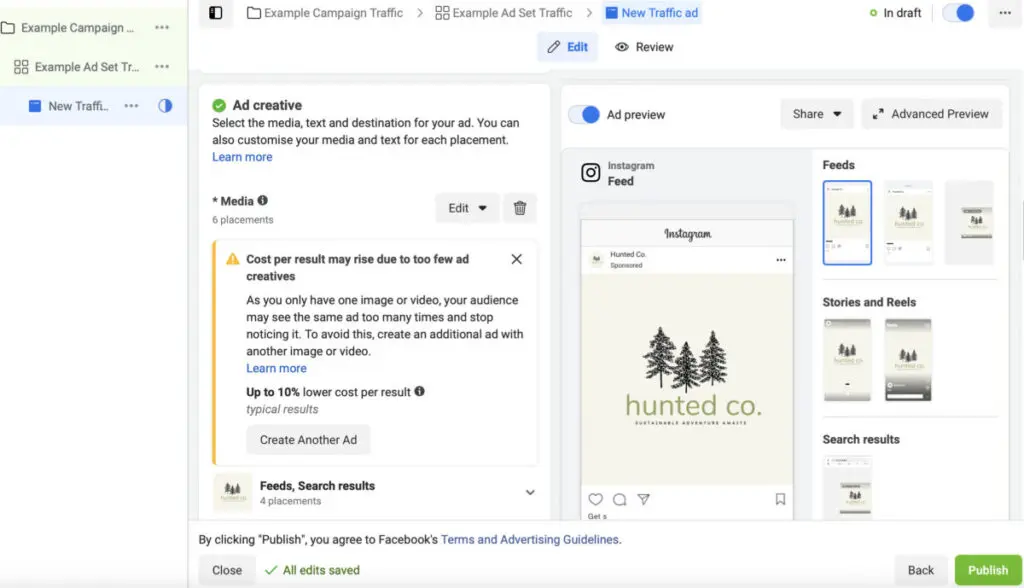
Step 8: Choose Your Ad Creative
One of the most important steps is customizing your ad creative as this is what will catch the audience’s eye and draw them in. You’ll need to upload the media you want to use in your ad. Make sure to keep Instagram ad sizes in mind to design eye-catching ads that look great across all placements. You don’t want to display ads with images that are awkwardly cropped or stretched.
While uploading your media, you can also select the option to allow enhancements. This will allow Meta to automatically make visual enhancements to ensure that the media looks great to users. Check out the preview on the right-hand panel to see how it looks and adjust your media accordingly.
Unless you’re using text overlay or audio to relay your message, you don’t want to simply share a picture or video without including any additional context. Your ad imagery should be accompanied by compelling text to get your message across more clearly. This will help you drive the point home and convince people to take action.
Keep your text short and straight to the point. As you can see in the following ad, the text below the ad carousel cuts off in the middle. If you don’t want this, make sure to keep optimal text lengths in mind when crafting your ad copy. Alternatively, you could get creative with this and find a way to entice people to expand the copy to read more.

If you choose to use dynamic creative, you’ll have the option to add multiple text and headline options. Additionally, you can toggle on the option to optimize text per person. This will allow Meta to swap text between fields if there’s a potential to improve performance.
Once you’ve finalized everything, choose a call to action from the drop-down menu. Meta offers several pre-set choices for call-to-action copy. Choose one that best fits your objective and ad copy.
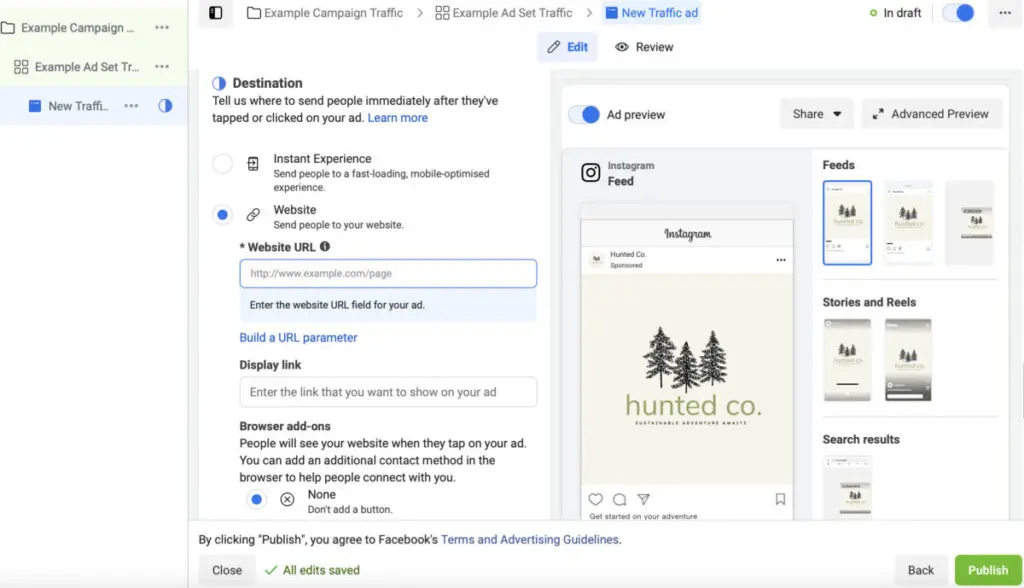
Step 9: Set Up Your Conversion Destination
The next step is crucial because it determines where people will take a conversion action, thus determining the overall performance of your ad. This is where you decide where to send people right after they click on your ad.
The process of setting up your conversion destination will vary depending on the type of objective you’ve chosen. For example, a traffic objective ad will require that you add a website URL and customize your display link. Meanwhile, a lead objective ad will require that you set up a form.
Step 10: Set Up Your Ad Tracking
Finally, you need to set up your ad tracking. This is another important step as it helps you monitor your campaign performance and make necessary optimizations to improve performance.
You can set up different event data sets containing the conversion actions people might take as a result of your ad. If you’re planning to track website events, you’ll need to create a pixel so that data about web events and parameters can be sent from your site.
Launch and Optimize
Once everything is set up, all you need to do is hit “Publish” for your ad to go live. Make sure to closely monitor how your ad is performing so you can quickly make changes and improvements in real-time. Test different ad copy, visuals, formats, and placements to see what resonates the most with your audience. This will help you maximize the impact of your ads and deliver higher returns.
Frequently Asked Questions
Where is Ads Manager on Instagram?
There’s no separate Ads Manager for Instagram. You can manage your Instagram ads from the Meta Ads Manager.
How do I post to Instagram from Ads Manager?
You can post to Instagram from Ads Manager by selecting Instagram as an ad placement.
How many days should you run Instagram ads?
If you’re running Instagram ads for the first start, start with a period of 6 days and make adjustments at the end of the timeline.
Can I run ads directly on Instagram?
You can run ads directly on Instagram by boosting your feed posts, Stories, and Reels.
How much are Instagram ads per 1,000 views?
Companies typically pay about $6 per 1,000 impressions on Instagram.


