YouTube is an incredible platform to build a loyal and engaged audience that feels personally connected to you. If you’re looking to take your personal interaction with your audience to the next level, you should consider adding live streaming to your YouTube strategy.
When you live stream on YouTube you can engage with your audience in real-time, respond to their questions and comments directly, and let them interact with you in an unedited way. More than this, it’s a great way to grow your audience on YouTube and build up the trust with your subscribers.
In this article, we’re going to take you through how to live stream on YouTube, how to promote your live streams, and more.
![]()
Video total
Most recent video
Subscribers growth
Avg engagements per video
Reactions
Comments
Estim. earnings per video
How to Live Stream on YouTube:
Step 1: Enable live streaming on YouTube
You might be eager to get your live streams up and running but before click that ‘go live’ button you need to make sure your channel meets YouTube’s live stream requirements. You first have to verify your channel (this can take up to 24 hours) and check that is doesn't infringe on any live stream restrictions. You’ll also need to ensure that your live stream content is aligned to the community guidelines.
If you plan on doing your live stream via a mobile device, you will need at least 1,000 subscribers. This restriction doesn’t apply to other devices though.
Step 2: Plan & prepare for your live stream
When it comes to live streams there’s something to be said for being improvisational, allowing viewers to get to know the real you. However, that doesn’t mean you can’t do some preparation for the live stream to make sure you and your audience get the most value from it.
Plan the format of your live stream - usually it will fall under one of the following types:
- Presentation / Demo
- Live class (interactive)
- Q&A discussion
- Interview with a guest
- Live event
- Gaming live stream
How are you going to provide value for your channel and audience? – to work this out answer the following questions:
- What is your goal for the live stream?
- What does your audience get from watching it?
- How does having a live stream enhance this topic?
- Will viewers who missed the live stream enjoy watching the recording later?
Plan your key points – jot down the key areas you want to cover during the live stream.
Call to action – what do you want your viewers to do after watching your live stream?
Video SEO – just like any normal YouTube video, make sure to optimize the video for SEO. This means you need to put in some research and planning for the following:
- Video title (Targeting a specific keyword/topic)
- Video description
- Video tags
Choose the best time to go live – to figure out the best time to go live you should check your YouTube Analytics to see when most of your subscribers are online. If possible, you could even run a poll with your audience to see what times they prefer (this is also a good opportunity to find out what topics they want you to cover).
Need some company? – you might consider inviting a co-host to your live stream to help keep the energy levels and interaction high throughout the length of the live stream or at the very least someone to help moderate and respond to the comments and questions that are coming in. It can be a challenge to do all that on your own.
Make sure your channel and video branding are up to scratch – to attract viewers (and subscribers) to your channel and videos it’s vitally important to design everything to draw in viewers, this includes:
- A channel icon or logo - if you don’t have one try one of these top logo makers.
- Channel art – if you plan to do regular livestreams, you could highlight that in your YouTube channel art.
- Video Thumbnail - Create an effective thumbnail to drive views for your live stream and recording.
- Have a Starting soon screen for your video – good branding opportunity and gives viewers time to head over to join you on your live stream.
- Overlay for live stream (only available if you are using live streaming software)
- End Screen – for when your live stream ends.
Check all those off and your channel and video branding are good to go!
Step 3: Promote your live stream before it goes live
You’ve now planned out your live stream. The next step is to promote it ahead of time to get people interested in attending. Here are some tactics to do just that.
Schedule your live stream in advance – doing this allows people to set reminders and make sure they have got a spot in their calendar to watch your live stream.
Highlight your live stream in your branding assets – as we’ve already mentioned you can highlight your live stream schedule in your YouTube channel art. You can also do the same across your other social profiles such as on Facebook, Twitter, Twitch, etc.
Make a trailer – you could make a quick trailer for your live stream and put that video in the ‘welcome video’ slot for your YouTube channel.
Encourage your subscribers to turn on notifications – this means whenever you go live on YouTube they will get a notification (and will hopefully attend your live stream).
Promote it across your other channels – make sure to spread the word across your other social channels and via your email list to garner interest. You can easily create posts and stories for your social profiles with a tool like Placeit.
Step 4: Pre-live stream checklist
No matter what platform you use for your live stream, whether it’s from a mobile device, computer or through live streaming software you should always check the following before you click ‘go live’:
- Frame space – make sure there’s no distractions or anything confidential in the background.
- Lighting – set up your lighting correctly so that everything is well lit. Here are some tips for that.
- Audio – Do a mic check to ensure everything sounds as it should.
- Batteries – Check the batteries of your camera and mic to ensure you stay connected throughout.
- Connection – check your internet speeds with a tool like speedtest.com
- Distractions – be sure to avoid any possible interruptions of your live stream e.g. put your mobile on silent.
- Accessibility – is your live stream accessible? If you have 10k+ subscribers, you can turn live automatic captions on.
- Monetization – if you’re looking to make money on YouTube you’re going to want to make sure monetization (such as displaying ads) is on for your live stream.
Step 5: Pick your platform
The three most popular ways of live streaming on YouTube are via a mobile device, PC, and live streaming software. What option you choose will depend on what your goals are, the production quality you’re looking for and the level of interactivity you require with your audience.
For most social streamers the mobile and web (PC) options will be more than enough, but more advanced streamers will most likely want to go down the streaming software route.
In this section we’re going to cover how to stream via all three of these options.
Mobile
As mentioned previously to live stream from a mobile device, you first need to have at least 1,000+ YouTube subscribers. If you don’t have 1,000 or more subscribers yet you can use an app such as Prism which will let you broadcast to YouTube even if you have no subscribers yet.
- Open up the YouTube app.
- Click on the ‘Create video’ button (camera icon) .
- Click "Live”.
- Give your stream a title, and select the privacy setting.
- If you want to schedule your live stream, check the box, and enter the date and time.
- Choose whether the content is target at kids or not.
- Add age restrictions if necessary.
- Click on more options to add a description, choose the topic category, and your camera and sound options.
- Under ‘advanced settings’ you can enable or disable live chat, monetization, promotions, and more.
- YouTube will then take a photo with your webcam to be used as the video thumbnail image – you can either use this, redo it, or upload a custom thumbnail.
- If you click share you can get a short link to you stream to share across your other social profiles to let them know you’re going live.
- If you’re ready to go live, click ‘Go live”.
- Click "Finish" to stop streaming.
PC
- Go to youtube.com
- Click on the ‘Create a video and more’ button (camera icon)
- Click on "Go Live"
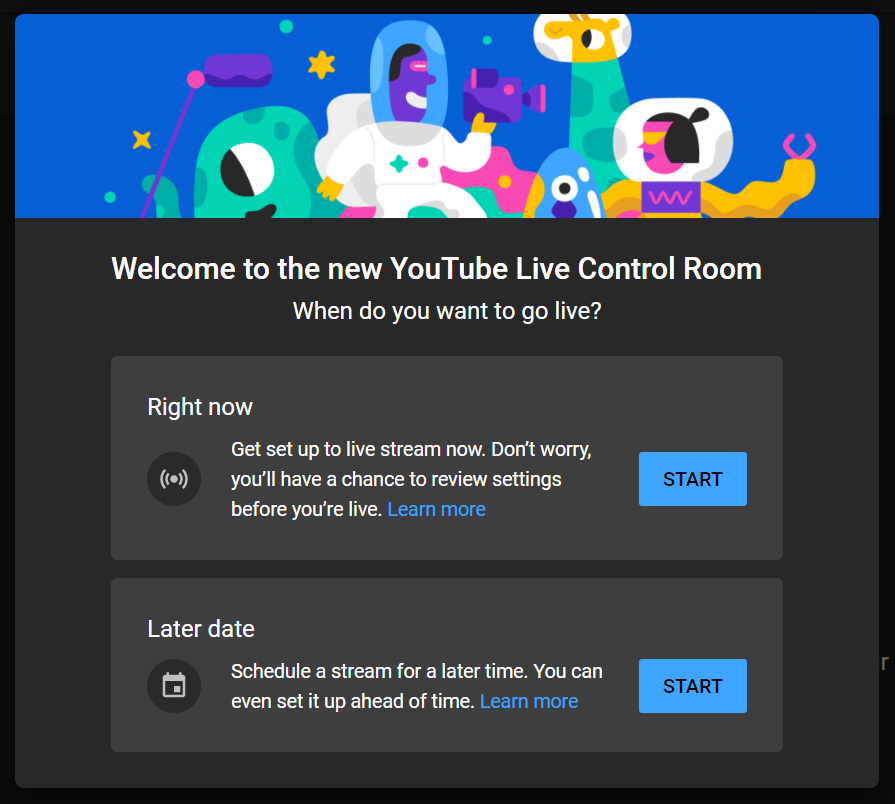
- Choose whether to go live right now or at a later date
- Choose the ‘Built-in webcam’ option
- Give your stream a title, and select the privacy setting
- If you want to schedule your live stream, check the box, and enter the date and time
- Choose whether the content is target at kids or not
- Add age restrictions if necessary
- Click on more options to add a description, choose the topic category, and your camera and sound options
- Under ‘advanced settings’ you can enable or disable live chat, monetization, promotions, and more.
- YouTube will then take a photo with your webcam to be used as the video thumbnail image – you can either use this, redo it, or upload a custom thumbnail
- If you click share you can get a short link to you stream to share across your other social profiles to let them know you’re going live
- If you’re ready to go live, click ‘Go live”
- On the right side you’ll have the chat where you can interact with your viewers
- When you’re finished click “End stream”
Live streaming software
There are quite a few options when it comes to live streaming software (also known as encoder software) such as Streamlabs, OBS, and StreamElements to name a few. All these options can help you level up and make much more professional looking live streams.
Here are just a few of the advanced options you get with using live streaming software:
- Multiple cameras
- Adding titles and videos on screen
- Using green screen
- The ability to split screen and bring other people on screen (e.g. for an interview)
- Share a presentation
- And much more!
Here’s how you can go live on YouTube using live stream software (it’s a very similar process for most encoders):
- Go to youtube.com
- Click on the ‘Create a video and more’ button (camera icon)
- Click on "Go Live"
- Select “Stream”
- Give your stream a title, and select the privacy setting and edit all the other settings as you wish
- If you want to schedule your live stream, check the box, and enter the date and time (a lot of live streaming products let you schedule streams from within their platform too)
- Click “Create stream”
- A Stream setup help popup should appear which will include your stream key, if not go to “Stream settings” and copy the stream key
- Paste the stream key into your encoder (usually in the “’settings’ section)
- Whatever live streaming software you’re using – make sure you’ve familiarized yourself with the platform and made all the customizations you want for your stream
- Hit “Go live” from your streaming software (this will send a preview of how your stream looks to YouTube but you won’t actually be live yet)
- If you’re ready to go live click “Go live” on YouTube
- When you’re finished click “End stream” on YouTube
Step 6: Engage your audience
The success of any live stream will be due to a combination of things including the preparation and topic but most importantly the way you engage your audience during and after the live stream.
Here are some of the best ways to keep your audience engaged in your live stream:
- Recaps – do the occasional quick recap for viewers who join your live stream part of the way through.
- Incentivize – give viewers a reason to stick around e.g. they’ll be rewarded with some important insights towards to the end, or a special deal, or a chance to have their questions answered directly.
- Give shout-outs – show your audience that appreciate their support and viewership by giving the occasional shout-out to specific audience members
- Get chatty – be sure to enable live chat and get involved in the discussions (or get a moderator to help with that). You can even use what goes on in the chat to drive the topics of your live steam to make everyone feel involved. Also, remember you can use moderator tools.
- Promote - Promote your YouTube live stream recording like you would for any one of your other YouTube videos to reach new viewers (and potential subscribers)
- Dive into the comments – once you’ve shared the live stream recording get involved in the comments to keep the discussions going and your audience engagement high. This is also a great place to discover potential topics for your next live stream.
Step 7: Analyze the performance
The final step is to analyze the performance of your live stream to see whether it was a success or not. To get a sense of that you should take a look at your YouTube analytics and answer the following questions:
- Did the live stream topic drive viewers?
- How long did people stick around? (what was the average view duration?)
- What parts of the live stream got the most responses? (questions, comments, etc.)
- Did the live stream drive new subscribers?
- What were the demographics of your viewers?
Keep track of all the insights and it will help you continually improve your live streams. Video analysis is a vital part of creating a successful YouTube channel.
To get even more qualitative insights you can comment on your video asking for feedback on your live stream (and for other topics your viewers would like to see covered) and pin it to the top of the comments.
Live streaming FAQ
Frequently Asked Questions
Is live streaming on YouTube free?
Live streaming on YouTube is 100% free. You just need to meet their requirements to be able to live stream.
How long can you live stream on YouTube?
You can stream for up to 12 hours on YouTube, anything longer won’t be visible.
How often should you live stream?
This depends on you – if you want to do a weekly live stream and have enough content topics to do so then great. Test to find out what frequency works best for you and your audience.
How long should your live stream be?
It may take some viewers 5 to 10 minutes to become notified of your live stream and to make their way over. So, we recommend streaming for at least 20 – 40 minutes and allowing for more time if your audience is still engaged. However, this will vary by topic and niche so again, test to find out what is the best fit for your channel.
Get started today
If you’re looking for ways to deepen your connection with your audience, build your viewership on YouTube or position yourself as an expert in your niche then live streaming on YouTube could be a great option for you.
By following the steps in this article, you’ll be well on your way to creating engaging live streams and building a loyal following for your channel.
Thinking about putting more effort into your YouTube channel? Take a look at our YouTube Earnings Calculator to find out how much your channel can make for you.


